
Tutorial time!
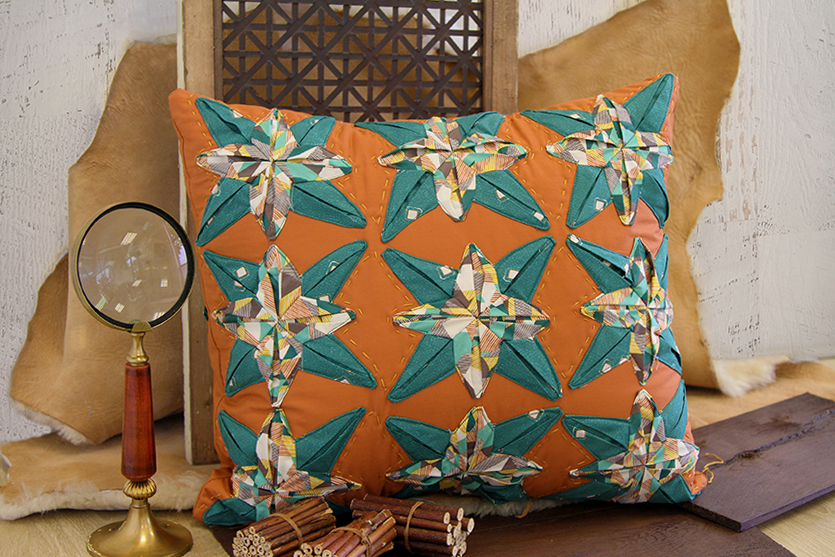
I cannot believe how happy I am that my Artisan Fabrics LookBook is out for all of you to see, I love every single project in it! And as always, the talented AGF team created another stunning LookBook. But now let's get to business, it's sewing month lovelies, and you all know what that means...sewing sewing and more sewing. I am going to show you how to make this beautiful yet easy 17 by 18 1/2 Starfold pillow case with an easy to follow step by step tutorial. With downloadable star pattern.
Materials
1/2 Yard of ART-53105
1/2 Yard of ART-53109
5/8 Yard of PE - 460
Hand Sewing Needle
Auri Floss Thread 5009
Pillow Case
Cutting Instructions
Cut (44) forty four pieces of central piece pattern with fabric ART-53105
Cut (44) forty four pieces of outer piece pattern with fabric ART-53109
Cut one (1) 17 1/2 by 19 square with fabric PE - 460 (including 1/2 inch seam allowance)
Cut two (2) 17 1/2 by 11 1/2 with fabric PE - 460
Step 1- Inner Star
Grab one of the (44) forty four pieces cut with fabric ART-53105 using Central Piece pattern and fold the outer laps towards the in and out as instructed on the diagram below. Once its folded, stitch the top 1/4 of an inch to keep the fold together. Repeat this same step with all (44) forty four pieces from fabric ART-53105.

Step 2
Once all the (44) forty four pieces are cut and 1/4 stitch at the top, grab four of them to begun creating the inner star. Place them as the image below and, this is the tricky part, start attaching the lower part of each piece together. Follow the arrows for directions.
On this step repeat step 1 with the (44) forty four pieces cut from fabric ART-53109 using the Outer Piece pattern.

Step 2- Connecting All Stars
Grab 4 pieces already connected into one star from fabric ART-53105 and 4 pieces from fabric ART-53109 and place them as the image below. Start connecting them by sewing the button part form fabric ART-53109 to complete star from fabric ART-53105. Follow arrows for guidance. Repeat this same step with the remaining pieces, giving you a grand total of eleven adorable stars!

Step 4
Now it's time to start attaching the eleven stars to the front part of our pillow. Grab one complete start and fold the edges a 1/4 on an inch in and iron press. Take 17 1/2 by 19 square from PE- 460 and place one of the stars on the right side, start stitching around the star with an 1/4 seam allowance, as shown on the image below.

Repeat Step 4 nine (8) times, follow image below for directions on star placement. Hang in there...we are almost done.

Step 5
Now we will leave our machine for rest and lets grab that sewing needle and thread! It's time to hand-stitch! Star hand stitching around 1/2 inch apart form the star.For the top row, stitch the entire star except the bottom part.

For the middle row, only stitch the sides.

And lastly for the bottom row, hand stitch the entire star except the top part.

Repeat step 5 for all eleven (11) stars, use image bellow for further guidance. Almost there lovelies, you are almost there of having the Starfold pillow complete!

Step 6
Now take the two 17 1/2 by 11 1/2 pieces and attach the remaining two (2) stars by following Step 4 and hand stitched them as instructed on Step 5. Place one star on each 17 1/2 by 11 1/2

Once these two pieces are complete, fold the top edges under by 1/2 inch and iron press, so they will not unravel over time. After this, if desire, straight stitch the folded edge.

Step 7
Start by laying the front piece of the pillow with the right side (stars) facing up and place the back panels on top with right side (starts) facing down. Pin all the pieces together and sew around with an 1/2 inch seam allowance. Fold it over and you will have your Starfold Pillow with a secret overlapping opening on the back where you insert your pillow body!

And it's happening everyone! Your Starfold pillow is complete, make sure to showcase this stunner where it will receive the attentions that it deserves!

Happy Sewing!
Pat B.
This is so cool! Thanks for sharing this interesting and striking pattern.
ReplyDeletePat Bravo Design : Starfold Pillow Tutorial >>>>> Download Now
Delete>>>>> Download Full
Pat Bravo Design : Starfold Pillow Tutorial >>>>> Download LINK
>>>>> Download Now
Pat Bravo Design : Starfold Pillow Tutorial >>>>> Download Full
>>>>> Download LINK kt
You're welcome Karen ☺
ReplyDeleteI love this!!!!
ReplyDeleteThank you Amy!
DeletePat Bravo Design : Starfold Pillow Tutorial >>>>> Download Now
ReplyDelete>>>>> Download Full
Pat Bravo Design : Starfold Pillow Tutorial >>>>> Download LINK
>>>>> Download Now
Pat Bravo Design : Starfold Pillow Tutorial >>>>> Download Full
>>>>> Download LINK k7