
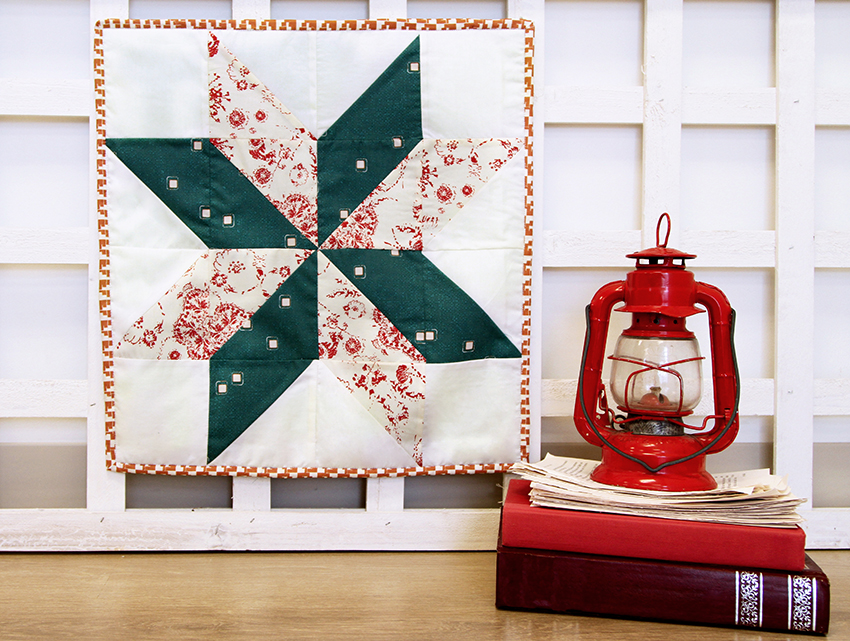
How are you all doing? I can't believe Christmas is just a couple of days away and I am still thinking how to decorate my home for the holidays. There are so many adorable Christmas adornments everywhere, but I wanted to make something more special and different this year.
So I made this massive, 20'' by 20'' star quilt block that I can hang anywhere in my house for decore, it is so easy and fast to make, so check the easy tutorial below. I used Artisan Fabrics for this quilt block because I think it fits the holidays hues perfectly.
Materials
Fat Quarter of PE-436 (Fabric A)
Fat Eight of ART-43106 (Fabric B)
Fat Eight of ART- 53109 (Fabric C)
Fat Quarter of ART-43107
1/4 of ART-43103 for Binding
Cutting Instructions
From PE-436
Cut eight (8) 5'' by 5'' squares and half square cut 4. So you will end up with four (4) 5'' b y 5'' and four (4) half square triangles
From ART-43106
Cut four (4) 5'' by 5'' squares and half square cut all 4. Leaving you with a grand total of eight (8) half square triangles.
From ART-53106
Cut four (4) 5'' by 5'' squares and half square cut all 4. Leaving you with a grand total of eight (8) half square triangles.
Step 1
Using 1/4'' seam allowance to everything.
Before attaching the first row of our quilt top:
•Take one (1) half square triangle of fabric A and B and sew it together.
• Do the same thing with the half square triangle of fabric C. Take one (1) half square triangle of fabric C and A and sew it together.
Once you have those two pieces all sew together (they will be a 5'' by 5'' squares) Lets take two (2) 5'' by 5'' squares of fabric A and lay then as shown below and attach them together.

To complete the second row, lets grab:
•One (1) half square triangle of fabric A, one (1) half square triangle of fabric C and sew it together (First square on the diagram below)
•One (1) half square triangle of fabric C, one (1) half square triangle of fabric B and sew it together (Second square on the diagram below)
•One (1) half square triangle of fabric C, one (1) half square triangle of fabric B and sew it together (Third square on the diagram below)
•One (1) half square triangle of fabric B, one (1) half square triangle of fabric A and sew it together (Last square on the diagram below)
Once these steps are completed, sew all the pieces together as explained below.

To complete the third row, lets grab:
•One (1) half square triangle of fabric A, one (1) half square triangle of fabric B and sew it together (First square on the diagram below)
•One (1) half square triangle of fabric B, one (1) half square triangle of fabric C and sew it together (Second square on the diagram below)
•One (1) half square triangle of fabric C, one (1) half square triangle of fabric B and sew it together (Third square on the diagram below)
•One (1) half square triangle of fabric C, one (1) half square triangle of fabric A and sew it together (Last square on the diagram below)
Once these steps are completed, sew all the pieces together as explained below.

To complete the fourth row, lets grab:
•Take one (1) half square triangle of fabric A and C and sew it together.
• Do the same thing with the half square triangle of fabric C. Take one (1) half square triangle of fabric B and A and sew it together.
Once you have those two pieces all sew together (they will be a 5'' by 5'' squares) Lets take two (2) 5'' by 5'' squares of fabric A and lay then as shown below and attach them together.

Now that all the rows are sewn together it is time to form the quilt block. Start by laying your pieces as explain below and attach each row.

Once you finish the step before you will end up with a piece looking like this

Quilt Assembly
• Place BACKING FABRIC on a large surface wrong side up. Stretch it with masking tape against that surface.
• Place BATTING on top of backing fabric.
• Place TOP on top of the batting with right side facing up. Smooth away wrinkles using your hands.
• Pin all layers together and baste with basting thread, using long stitches. You can also use safety pins to join the layers.
• Machine or hand quilt starting at the center and work-ing towards the corners. Remember that quilting motifs are a matter of personal preference. Have fun choosing yours!
• After you finished, trim excess of any fabric or batting, squaring the quilt to proceed to bind it.
Binding
• Cut enough strips 1½" wide by the width of the fabric I to make a final strip 280" long. Start sewing the binding strip in the middle of one of the sides of the quilt, placing the strip right side down and leaving an approximated 5" tail. Sew with ¼" seam allowance (using straight stitch), aligning the strip’s raw edge with the quilt top’s raw edge.
• Stop stitching ¼" before the edge of the quilt (DIAGRAM B1). Clip the threads. Remove the quilt from under the machine presser foot. Fold the strip in a motion of 45° and upward, pressing with your fingers (DIAGRAM B2). Hold this fold with your finger, bring the strip down in line with the next edge, making a horizontal fold that aligns with the top edge of the quilt (DIAGRAM B3). Start sewing at ¼" of the border, stitching all the layers. Do the same in the four corners of the quilt.
• Stop stitching before you reach the last 5 or 6 inches. Cut the threads and remove the quilt from under the machine presser foot. Lay the loose ends of the binding flat along the quilt edge, folding the ends back on themselves where they meet. Press them together to form a crease. Using this crease as the stitching line, sew the two open ends of the binding with right sides together (you can help yourself marking with a pencil if the crease is difficult to see).
• Trim seam to ¼" and press open. Complete the sewing. Turn binding to back of the quilt, turn raw edge inside and stitch by hand using blind stitch.

And voila, your star quilt block is ready! I was really interested in doing some sort of quilting and sewing decoration, and when I remember about this block.....ideas flew to mind.

I loved making this little holiday project and I hope you love making it! Stay tuned because there is another little project coming your way.
Happy sewing and happy holidays!
xoxo
Pat B.
Love this block....thanks for the inspiration.
ReplyDeleteYou're welcome!
ReplyDeleteWow! This is a very wonderful post and Great advice! Up to 85% Off! The Eades Discount Wallpaper and Fabric Shopping System is now Online! Shop for all your wallpaper and wallcovering needs! We have wallies, fatheads, wallpaper, and borders. Add the items to your cart! Shop with us 24/7 for all your discount needs! Thank you for sharing valuable information.
ReplyDelete