Showing posts with label Artisan Fabrics. Show all posts

Friday, February 5, 2016

EQ Stash 2016 Download 1

Hello everyone! 

I am so thrilled to announce the newest download of   EQ Stash Online 2016 which features Artisan and Dare Fabrics! I am beyond excited to be a part of the EQ 7 Stash for the second time (first time featuring Etno Fabrics


I just love EQ7, this is my go-to software when designing quilts. It is so helpful and easy to understand (for the new quilters out there) and now that I can use my fabrics when designing makes me really happy!


Make sure to get EQ7 newest stash, with my fabrics as well as Art Gallery Fabrics!

Happy quilting ☺


xoxo, 

Pat

Friday, January 29, 2016

My inspiration behind Carved Quilt


Hello everyone and happy Friday ☼


For a while now, I wanted to share with you my inspiration behind Carved Quilt.  Lots of people have inquired about it and I think is better to do a blog post, which also gives me the opportunity to share some images. Creating “Carved" was such a fun experience! I think it was the first quilt I designed right after I finished designing my Artisan line. Cross motives were super trendy and some of the inspiration I had when creating the fabric line. By that time I was making quilts to display on my booth at International Quilt Market and I thought it would be great to do something special. The idea of a giant cross came to mind and it was great to start playing with the design and the fabrics. This beauty was center stage at my booth along with other quilts, I cannot be thankful enough for all the complements I had!


For me, Artisan is a celebration of the unstyled and the expression of the maker's heart. Therefore, I wanted to create a quilt that reflected the handcraft look we all love; I wanted  Carved to be iconic. The particular placement of the small fabric squares truly made Carved more exciting as I kept working on it. Constructing the top wasn’t as hard as it looks, only time consuming, due to all the cutting. But trust me, it is so worth it and hope you think the same. 


I am so happy that Carved, now cleverly renamed “Grand Total” (I just adore that name) will take part of the quilt along “It all Adds Up” in the American Patchwork and Quilting Magazine which will feature four other pretty projects with one theme in common……plus- sings! The April issue will hit shelves Feb. 2nd, make sure to grab yours and be a part of this outstanding quilt along!


xoxo,

Pat

Friday, September 4, 2015

Hello Artisan!


Artisan is here!

"Capturing the expression of the maker’s heart and the objects created. Artisan is a celebration of the unstyled that links etching florals, wood carving and denim rustic textures in a handcrafted dance. It features a bohemian color palette with denim blue, lumberjack red & raw sienna as the notes that paint these textiles." 

From the moment I started designing Artisan, I knew that I will love it! And hearing the feedback I received at Spring Quilt Market with just a couple of projects and quilts at my booth, I was blown away and truly humbled. But now I can see the full effect of Artisan with the countless projects and outfits that are featured in this LookBook. I can honestly say that Artisan is perfect for both quilting and apparel, so lovelies visit your local quilt store, if you haven't yet, and get your hands on Artisan!
The versatility that Artisan have is what makes me love it even more, like I just stated, this collections works perfectly for apparel, quilting and home decor! And now lovelies, please make sure to check the #ArtisanFabrics Lookbook that the talented AGF team put together for all of you!


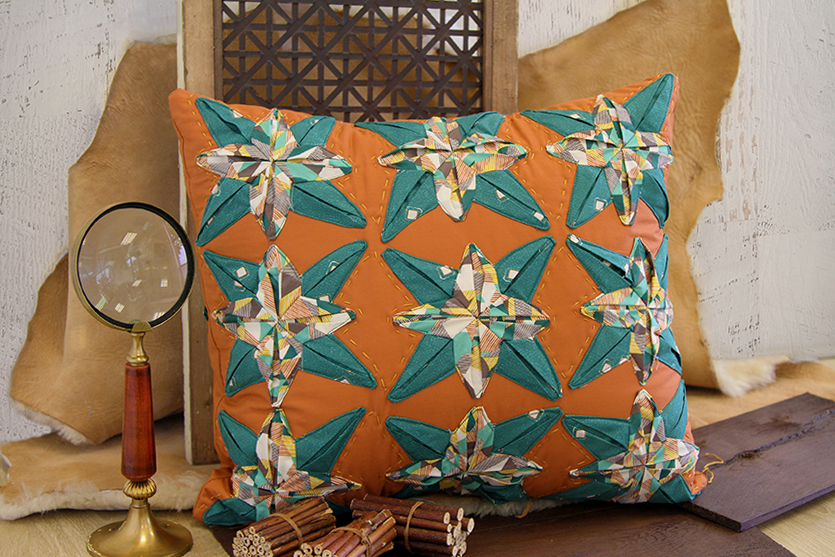
Loving this Starfold pillow? Well you can make it by just clicking here! You can get the detailed step by step tutorial, 


Lovelies, don't forget we are in September, which means sewing month, so lets sew and sew. Download the Heirloom Free Pattern here!


Make sure to visit the Art Gallery Fabrics Creative blog for a chance to win a Fat Quarter of #ArtisanFabrics


Words cannot express how happy I am, I hope you all love Artisan as much as I do, and I can't wait to see what you all create with it! 

xoxo, 


Pat B. 


Thursday, September 3, 2015

Gava Rug Tutorial


I am so lucky to have my Artisan LookBook out in Sewing Month! All of you will have enough projects for a whole month and as I promise you all! Here is the step by step tutorial on the Gava Rug that is feature on the #Artisanfabrics Lookbook ☺

Happy Sewing!

Fabric Requirements 

Fabric A  ART-43106 ⅛ yd.                                
Fabric B   ART-53106  ¼ yd.  
Fabric C ART-53105      1/₆yd.
Fabric D ART-53109 ½ yd.
Fabric E ART-43103  ⅜ yd.
Fabric F ART-53107  1/₆ yd.
Fabric G ART-53102 1/₆ yd.
Fabric H ART-53108 ⅜ yd.
Fabric I ART-43105 ½ yd.
Fabric J ART-43101 1/₆ yd.

BACKING FABRIC  
PE-429 1 ½ yds. (Suggested)
BINDING FABRIC
ART-53106 (Fabric B) (included)

Template

Make sure to download this template here


Cutting Directions

¼" seam allowances are included.
WOF means width of fabric.

Nine (9) 2¼" x 4" Rectangles from fabric A.

Six (6) 2¼" x 4" Rectangles from fabric B.

Fifteen (15) 2¼" x 4" Rectangles from fabric C.

Fifteen (15) 2¼" x 4" Rectangles from fabric D.

Six (6) 1¼" x WOF strips from fabric D.

Two (2) 2" x WOF strips from fabric D.

Four (4) 2½" x WOF strips from fabric E.

Two (2) 2" x WOF strips from fabric F.

Two (2) 2" x WOF strips from fabric G.

Four (4) 2½" x WOF strips from fabric H.

Two (2) 2" x WOF strips from fabric I.

Six (6) 1¼" x WOF strips from fabric J.

Two (2) 3½" x WOF strips from fabric J.

Construction

Sew all rights sides together with ¼"seam allowance. 

In order to complete the quilt top you will need to make a certain amount of patched triangles.
There will be two different fabric arrangements for the triangles.
Start with combination a triangle by taking two 2½" x WOF strips from fabric E, three 1¼" x WOF strips from fabric D, one 2" x WOF strip from fabric F and one 2" x WOF strip from fabric G.
Start attaching the strips in the order EDFDGDE
Now, for combination b take two 2½" x WOF strips from fabric H, three 1¼" x WOF strips from fabric J, one 2" x WOF strip from fabric D and one 2" x WOF strip from fabric I.
Attach the strips in the order HJDJIJH
Make two patched strips pieces from each combination.
Using the provided template (on the last page) start cutting the triangles.
You should be able to cut seven triangles from each strip piece, four facing up and three down.
Cut a total of fourteen triangles for each combination.

There should be seven triangles facing up and seven facing down for each combination.


Group the triangles that are exactly alike, that means four groups of seven triangles.
Take the first group and arrange the triangles together in a row.
Place triangles in alternating order. One triangle pointing down the other pointing up.
Continue to sew the row.
Repeat the previous steps with the other group of triangles.


Take all the rectangles from fabrics A, B, C and D
Make three rows of fifteen rectangles each.
Stitch them together on the long side of the rectangle.
Follow the order below or attach them in random order it's up to you.
Order: ACDBCDACDBCDACD 


Now it's time to sew all the rows together 
Follow the cover picture as a reference for fabric placement..
Start with one rectangles strip following with one com b row, com a row, rectangles strip, com b, com a and end with a rectangles strip.


Trim the excess fabric for the sides to end up with a 26½ x 42½ rectangle.


Assembling The Top

Sew all rights sides together with ¼"seam allowance. Press open.
Take the 3½" x WOF strips from fabric J and attach each to one of the long sides of the quilt top.
Trim the excess fabric.

Quilt Assembly 

Sew rights sides together.
Place BACKING FABRIC on a large surface wrong side up. Stretch it with masking tape against that surface.
Place BATTING on top of backing fabric.
Place TOP on top of the batting with right side facing up. Smooth away wrinkles using your hands.
Pin all layers together and baste with basting thread, using long stitches. You can also use safety pins to join the layers. 
Machine or hand quilt starting at the center and working towards the corners. Remember that quilting motifs are a matter of personal preference. Have fun choosing yours!
After you finished, trim excess of any fabric or batting, squaring the quilt to proceed to bind it. 

Binding

Sew rights sides together.
Cut enough strips 1½" wide by the width of the fabric B to make a final strip 158" long. Start sewing the binding strip in the middle of one of the sides of the quilt, placing the strip right side down and leaving an approximated 5" tail. Sew with ¼" seam allowance (using straight stitch), aligning the strip’s raw edge with the quilt top’s raw edge. 
Stop stitching ¼" before the edge of the quilt (DIAGRAM B 1). Clip the threads. Remove the quilt from under the machine presser foot. Fold the strip in a motion of 45° and upward, pressing with your fingers (DIAGRAM B2). Hold this fold with your finger, bring the strip down in line with the next edge, making a horizontal fold that aligns with the top edge of the quilt (DIAGRAM B3). Start sewing at ¼" of the border, stitching all the layers. Do the same in the four corners of the quilt.
Stop stitching before you reach the last 5 or 6 inches. Cut the threads and remove the quilt from under the machine presser foot. Lay the loose ends of the binding flat along the quilt edge, folding the ends back on themselves where they meet. Press them together to form a crease. Using this crease as the stitching line, sew the two open ends of the binding with right sides together (you can help yourself marking with a pencil if the crease is difficult to see). 
Trim seam to ¼" and press open. Complete the sewing. Turn binding to back of the quilt, turn raw edge inside and stitch by hand using blind stitch.


Congratulations everyone! You have successfully completed  the Gave Rug tutorial. Now place this beauty below your bed and used it for a fun picnicking ☺


Wednesday, September 2, 2015

Starfold Pillow Tutorial

Tutorial time!

I cannot believe how happy I am that my Artisan Fabrics LookBook is out for all of you to see, I love every single project in it! And as always, the talented AGF team created another stunning LookBook. But now let's get to business, it's sewing month lovelies, and you all know what that means...sewing sewing and more sewing. I am going to show you how to make this beautiful yet easy 17 by 18 1/2 Starfold pillow case with an easy to follow step by step tutorial. With downloadable star pattern. 


Materials 
1/2 Yard of ART-53105
1/2 Yard of ART-53109
5/8 Yard of PE - 460
Hand Sewing Needle
Auri Floss Thread 5009
Pillow Case


Cutting Instructions 
Cut (44) forty four pieces of central piece pattern with fabric ART-53105
Cut (44) forty four pieces of outer piece pattern with fabric ART-53109
Cut one (1) 17 1/2 by 19 square with fabric PE - 460 (including 1/2 inch seam allowance)
Cut two (2) 17 1/2 by 11 1/2 with fabric PE - 460


Step 1- Inner Star
Grab one of the (44) forty four pieces cut with fabric ART-53105 using Central Piece pattern and fold the outer laps towards the in and out as instructed on the diagram below.  Once its folded, stitch the top 1/4 of an inch to keep the fold together.  Repeat this same step with all  (44) forty four pieces from fabric ART-53105. 


Step 2
Once all the (44) forty four pieces are cut and 1/4 stitch at the top, grab four of them to begun creating the inner star. Place them as the image below and, this is the tricky part, start attaching the lower part of each piece together. Follow the arrows for directions.


Step 2- Outer Star
On this step repeat step 1 with the (44) forty four pieces cut from fabric ART-53109 using the Outer Piece pattern.


Step 2- Connecting All Stars 
Grab 4 pieces already connected into one star from fabric ART-53105 and 4 pieces from fabric ART-53109 and place them as the image below. Start connecting them by sewing the button part form fabric ART-53109 to complete star from fabric ART-53105. Follow arrows for guidance. Repeat this same step with the remaining pieces, giving you a grand total of eleven adorable stars! 


Step 4

Now it's time to start attaching the eleven stars to the front part of our pillow. Grab one complete start and fold the edges a 1/4 on an inch in and iron press. Take 17 1/2 by 19 square from PE- 460 and place one of the stars on the right side, start stitching around the star with an 1/4 seam allowance, as shown on the image below. 


Repeat Step 4 nine (8) times, follow image below for directions on star placement.  Hang in there...we are almost done. 


Step 5
Now we will leave our machine for rest and lets grab that sewing needle and thread! It's time to hand-stitch! Star hand stitching around 1/2 inch apart form the star.

For the top row, stitch the entire star except the bottom part.


For the middle row, only stitch the sides.


And lastly for the bottom row, hand stitch the entire star except the top part.


Repeat step 5 for all eleven (11) stars, use image bellow for further guidance.  Almost there lovelies, you are almost there of having the Starfold pillow complete!


Step 6
Now take the two 17 1/2 by 11 1/2 pieces and attach the remaining two (2) stars  by following Step 4 and hand stitched them as instructed on Step 5. Place one star on each  17 1/2 by 11 1/2


Once these two pieces are complete, fold the top edges under by 1/2 inch and iron press, so  they will not unravel over time.  After this, if desire, straight stitch the folded edge.


Step 7
Start by laying the front piece of the pillow with the right side (stars) facing up and place the back panels on top with right side (starts) facing down. Pin all the pieces together and sew around with an 1/2 inch seam allowance.  Fold it over and you will have your Starfold Pillow with a secret overlapping opening on the back where you insert your pillow body!


And it's happening everyone! Your Starfold pillow is complete, make sure to showcase this stunner where it will receive the attentions that it deserves!


Happy Sewing!


Pat B. 


Monday, August 17, 2015

New Society 6 Items

Hello Lovelies!

Due to Artisan's release, I am so happy to introduce some new items that are added to my Society6 page featuring some prints from Artisan. I decided to launch my new Society 6 products with Ad Lib Bloom Shout from the Denim palette. Even though, I adore all the prints from #ArtisanFabrics, this one in particular is one of my favorites. The flowers gave this print a romantic yet rustic allure perfect for your electronics and even home decor....cushions anyone! Society 6 has many new products this time around, for example, now you can purchase laptop covers which was something that Society 6 didn't have before as well as wall tapestries! I so excited with their new products! I am going to have some fun adding more products in a couple of days☺☺


Don't forget to visit my Society 6 page for more products!

xoxo

Pat.

Friday, July 31, 2015

#ArtisanFabrics

Happy Friday Lovelies!

I finally had time to shoot some of my advance yardages of my upcoming collection, Artisan. As you all know, this collection developed by capturing the expression of the maker's heart and the objects created. Artisan is a celebration of the unstyled that links etching florals, wood carving and denim rustic textures in a handcrafted dance. 

The hues that each print has are remarkable, and the quality- 100% PREMIUM cotton- is the best out there. Truly, Art Gallery Fabrics quality is the best and you can FEEL THE DIFFERENCE with just one touch.   


Each print combines perfectly with each other! I really need to make a quilt ASAP! Take Pyrography North, Intervill Patience and Aged Allure Raw-all from the Wood color pallet- for example, they blend excellently.....table runner anyone? ☺☺


Or even mixing prints from different color ways like, Ad Lib Blooms Shout and Betoken Shines from the Denim color pallet along with Collar Ends Bronze from the Wood color pallet. Both of this choices work perfectly together. They will go amazingly on a quilt or table runner....all right, I need to make a table runner as well!! 
But lets not forget apparel. I see dresses, pants, blouses and rompers featuring this collection. And due to one of my lasts post, I see a lovely baby girls dress with Ad Lib Blooms! 


Artisan will be available at your local quilt shop this August and I really need to see what all you lovelies are going to create with it. Share all your projects on your favorite social media channels using #ArtisanFabrics

Stay tuned for the outstanding Lookbook that the talented AGF team will put together for  more projects ideas with Artisan.


xoxo,

Pat

Wednesday, April 8, 2015

My Upcoming Collection, Artisan!


Lovelies!

I am SO happy and excited -beyond words- that I can finally introduce my upcoming collection! Artisan. I was honestly counting the days for this moment, and it is surely here! This collection captures the expression of the maker's heart and  the objects created. My inspiration flourished by going back to the traditional skills of the maker, built on the principles of passion, craftsmanship and authenticity. Artisan is a celebration of the unstyled that links etching florals, wood-carving and denim rustic textures in a handcrafted balance.
I am very passionate about this new collection of mine which features a bohemian color palette with denim blue, lumberjack red and raw sienna as the notes that paint these textiles.


For the second time, I am showcasing knits and voile!  I honestly can't wait to see the wonderful and creative projects that you will create with these. 


If you want to know more about  Artisan, make sure to check this Lookbook that I created for all of you!


I am so happy that I can finally show you my upcoming collection, I love every minute that I spend designing it, and I hope you will love it as well. Stay tuned, Artisan hits stores on August 2015.  


xoxo,


Pat. 
10