Showing posts with label sewing tutorial. Show all posts

Monday, February 19, 2018

Fashion and Indie Folk

Hello everyone!

I wanted to make this blog post for a long time now, but I finally took a little break from sewing and making fun YouTube videos and started typing away. As you all know, I love fashion and I seek inspiration for future collections on the latest fashion runways. Once my collection is finished, I refer to fashion runways and trends, once again, for my LookBook production.
For example, I created these stunning pair of jeans with my Khokhloma Burgundia print. I cut some of the big and small flowers and glued it to the jeans with fabric glue. I was inspired to do so by looking at some awesome fashion trends.  


When I design my collections, I focus on how these fabrics are going to be use for future makers. I want to make sure they can make their outstanding quilts as well as fabulous outfit. For example using Khokhloma Gloom and Flecks Indigo, I created this jacket, which perfect for a Sunday stroll.


So there you have it, a little bit of my inspiration when creating textile designs. Stay tuned for a new video coming up your way very soon. Make sure to subscribe to my YouTube channel and hit the bell button to be notify of new awesome videos! 

xoxo


Pat B.

Monday, February 12, 2018

Tutorial Time! Rosemary's ♥ Quilt

Hello, hello everyone! 

I had been working so hard on my upcoming videos that I almost forgot to share this quick blog post! I must admit, I am having a blast filming and viewing the final result of my videos. Specially, I am so happy that I can connect with my lovely followers in another social platform, so excited for the upcoming videos! On today's post, I want to share this stunning Wall Art tutorial, isn't gorgeous? The Rosemary's ♥ quilt would be a perfect Vanlentine's Day project! So boho, so stylish, I love it and the best part is that it is a FREE pattern that you can download here!

http://liveartgalleryfabrics.com/wp-content/uploads/2017/11/rosemarys-heart-quilt-instructions.pdf


The Rosemary's Heart Quilt is so fun to make, you guys are going to enjoy every minute sewing this beauty. So everyone, get those weekly calendars out and add this project on your to do list!


I hope you enjoy making this wall art, and place this stunner center staged on your home which will be a perfect conversation starter! 

So...get ready...sew!

xoxo

Pat B. 

Thursday, November 9, 2017

Tartan Envelope Pouches

Hello everyone!! 

How do you like the #IndieFolkFabrics LookBook? It is filled with so many easy and adorable projects like these Tartan Envelope Pouches. I created these beauties for Quilt Market and my lookbook using my very friendly BERNINA 790.

https://weallsew.com/tartan-envelope-pouches/

Do you want to learn how to make these cute little pouches? Make sure to visit the BERNINA blog We All Sew for the complete tutorial.


Happy sewing everyone!


Pat B.  

Friday, May 13, 2016

The Jetsetter Bags

Hello everyone!

The weekend is almost here and I have a weekend projects for all of you, The Jetsetter Bags! Quilt Market is just around the corner, and some of you are packing for Salt Lake City. So, these adorable little bags are perfect to organize and store your goodies when traveling.


Click here to get the full tutorial over We All Sew and happy sewing everyone, remember that on Monday I will be having The Minis Blog Tour Recap, so make sure to stay tuned! 


Monday, March 21, 2016

At Ease Placemat Tutorial

Hello lovelies!

Here is another stunning and easy projects for you to do featuring Essentials II Fabrics ☺, have fun sewing this cutie! 


Fabric Requirements 2 1/2” x 10 1/2” strips from Fabric A-F
Fabric A- ESS - II- 152
Fabric B- ESS - II- 153
Fabric C- ESS - II- 155
Fabric D- ESS - II- 150
Fabric E- PE- 434
Fabric F- PE- 465
Fabric G- DEN-L-4000- Fat Eighth
Fabric H- DEN-S-2003- Fat Eighth
Fabric I- DEN-S- 2001- Fat Eighth 

Cutting Directions
Sew at 1/4” seam allowance with right sides together. 
One (1) 2 1/2” x 10 1/2” strips from Fabric A-G
One (1) 6 1/2“ x 7 1/2” rectangle from Fabric G
One (1) 6 1/2“ x 14 1/2” rectangle from Fabric H
One (1)- 6 1/2” square from Fabric I

Step 1: Sewing the Strips

Sew 2 1/2” x 10 1/2” strips together in the following order:  A, B,E,C,F,G,and D


Step 2: Pocket
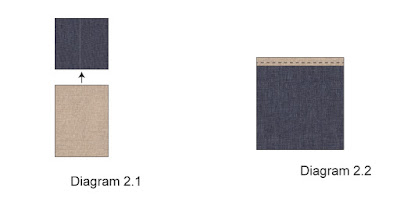
Take a 6 1/2” square from Fabric I and sew it to the 6 1/2” side of a 6 1/2” x 7 1/2” rectangle from Fabric G with right sides together.(Diagram 2.1)
Flip fabrics so wrong sides are touching and match the other 6 1/2” ends of each piece together. This will create a faux binding at the top of your pocket! Topstitch at 1/8” from the seam to secure
pocket pieces.


Step 3: Sew the Front Placemat
Take pocket and pin on the bottom corner of a 6 1/2” x 14 1/2” rectangle from Fabric H. (Diagram 3)


Take piece made in Diagram 3 and sew it to your strips.  (Diagram 4)


Take a piece of batting a little bit bigger then your front placemat and pin together. Quilt as desired! I quilted straight horizontal lines at different widths.
Once you front placemat is quilted it’s time to square off your piece. Use your front placemat as a template to cut ou the backing in Fabric J.
Place right sides together and sew around the entire piece at 1/4” making sure to leave a small unsewn portion to flip your place mat to the right side of the fabric.
Flip your placemat through and hand sew unsewn portion closed!


Saturday, March 19, 2016

Oslo Bag

Hello everyone!

I know, I am shocking everyone with so many tutorials, but you know what that means....sewing time! Let's get that rotary cutter and mat and let's begin. 


Fabric Quantity
1 yard of ESS-II-154 Fabric A
¼ yard of ESS-II-153 Fabric B
1/3 yard of PE-454 Fabric C
1 Fat Quarter of ESS-II-151 Fabric D

Cutting Instructions
Cut 2 (two) 12’’ by 15’’ of ESS-II-154
Cut 2 (two) 12’’ by 19.5’’ of ESS-II-154
Cut 1 (one) 3’’ by 25’’ of ESS-II-153
Cut 2 (two) 3.5’’ by 15’’ of ESS-II-151
Cut 2 (two) 2’’ by 12’’ of PE-454   
Cut 2 (two) 2’’ by 44’’ of PE-454

Step 1
Take one of the 12'' by 15'' pieces of Fabric A and one of the 2'' by 12'' of Fabric C. Place Fabric C, 1/2 inch of it on top of Fabric A and the extra inch outside Fabric A, stitch in place.
Repeat this same step with the last piece of Fabric A and C. This will leave you with two pieces which will be the front of your bag.


Step2
Take one of the 3.5'' by 15'' pieces of Fabric D and place its right side facing the right side of the front of your bag (Step 1) Sew 1/4 of inch from the edge of Fabric A, not the extra fabric from Fabric C 

Repeat this same step with the last piece of Fabric D

Step 3

Now it is time to make the round base of the bag. Cut the sides of the front of the bag on a 45 degree angle, as explained on the image below. 


Repeat this previous step with the other front piece of your bag.


Step 4
Take one of the 12’’ by 19.5’’ pieces of Fabric A and place the final front piece of the bag on top of it and use it a template to cut the lining, mimicking the same shape. 

Repeat the same step with the last piece of Fabric A


Step 5

Take the two frontal pieces, place right sides facing each other and sew around, leaving the front part unsew. Repeat the same step with the lining pieces


Step 6
Now that you have the front and lining sewn is it time to attach them together. Turn over the front of the bag piece and leave the lining inside out. Place lining inside the front of the bag and instructed on the image and set aside.
Step 7
Now it is time to make the casing of the bag, take the 3’’ by 25’’ of Fabric B and make these three steps:
  1. Fold the strip in half and press
  2. Open pressed strip and fold edges 1/4'' inside and press.
  3. Now fold side edges 1/4'' inside and press.
See image for reference.  


It's time to sew the side edges together so me can have a round casing. With the casing opened and folded in half, ping right sides together and stitch edges using 1/4 seam allowance. See image image below for assistance.

Once this is completed, turn it over, folded in half and press. 

Step 8 
Now it is time attached the casing to the bag. Take your piece already completed in step 6 and  sandwich the casing to the bag, making sure it grabs both the front of the bag and lining. Pin around the bag and stitch 1/4'' from the edge of the case, if you desire, you can double stitch as I did. 


Step 9
Lastly, it's time to make the straps. With the last two pieces of Fabric C, make these three steps:
  1. Fold top edged 1/2'' in and press (Do this for both straps)
  2. Fold side edges 1/4'' in and press (Do this for both straps)
  3. Take both straps with folded sides facing each other and sew around the right side of the fabric with 1/8'' seam allowance.
Step 10
Stitch a rectangle with an "X" inside to secure the strap. Make this step on each side. 


And voila! You are all set and ready to carry your goodies in style ☺ 


Wednesday, September 2, 2015

Starfold Pillow Tutorial

Tutorial time!

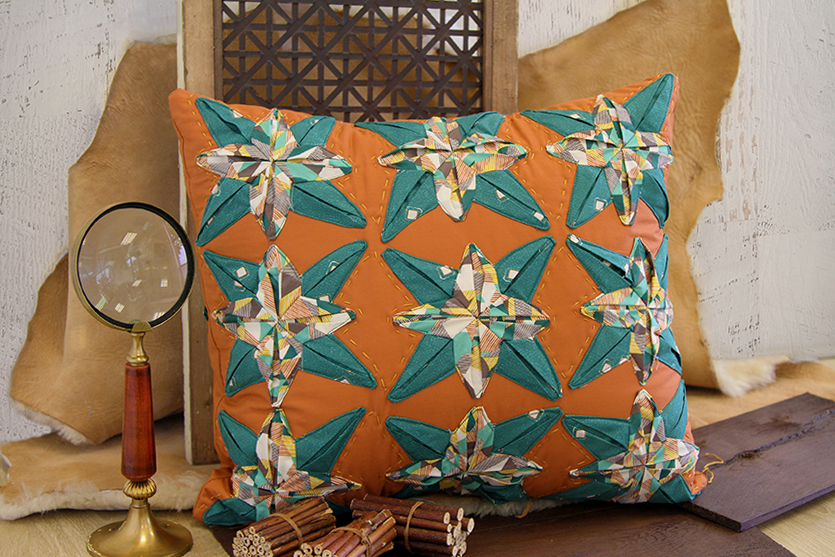
I cannot believe how happy I am that my Artisan Fabrics LookBook is out for all of you to see, I love every single project in it! And as always, the talented AGF team created another stunning LookBook. But now let's get to business, it's sewing month lovelies, and you all know what that means...sewing sewing and more sewing. I am going to show you how to make this beautiful yet easy 17 by 18 1/2 Starfold pillow case with an easy to follow step by step tutorial. With downloadable star pattern. 


Materials 
1/2 Yard of ART-53105
1/2 Yard of ART-53109
5/8 Yard of PE - 460
Hand Sewing Needle
Auri Floss Thread 5009
Pillow Case


Cutting Instructions 
Cut (44) forty four pieces of central piece pattern with fabric ART-53105
Cut (44) forty four pieces of outer piece pattern with fabric ART-53109
Cut one (1) 17 1/2 by 19 square with fabric PE - 460 (including 1/2 inch seam allowance)
Cut two (2) 17 1/2 by 11 1/2 with fabric PE - 460


Step 1- Inner Star
Grab one of the (44) forty four pieces cut with fabric ART-53105 using Central Piece pattern and fold the outer laps towards the in and out as instructed on the diagram below.  Once its folded, stitch the top 1/4 of an inch to keep the fold together.  Repeat this same step with all  (44) forty four pieces from fabric ART-53105. 


Step 2
Once all the (44) forty four pieces are cut and 1/4 stitch at the top, grab four of them to begun creating the inner star. Place them as the image below and, this is the tricky part, start attaching the lower part of each piece together. Follow the arrows for directions.


Step 2- Outer Star
On this step repeat step 1 with the (44) forty four pieces cut from fabric ART-53109 using the Outer Piece pattern.


Step 2- Connecting All Stars 
Grab 4 pieces already connected into one star from fabric ART-53105 and 4 pieces from fabric ART-53109 and place them as the image below. Start connecting them by sewing the button part form fabric ART-53109 to complete star from fabric ART-53105. Follow arrows for guidance. Repeat this same step with the remaining pieces, giving you a grand total of eleven adorable stars! 


Step 4

Now it's time to start attaching the eleven stars to the front part of our pillow. Grab one complete start and fold the edges a 1/4 on an inch in and iron press. Take 17 1/2 by 19 square from PE- 460 and place one of the stars on the right side, start stitching around the star with an 1/4 seam allowance, as shown on the image below. 


Repeat Step 4 nine (8) times, follow image below for directions on star placement.  Hang in there...we are almost done. 


Step 5
Now we will leave our machine for rest and lets grab that sewing needle and thread! It's time to hand-stitch! Star hand stitching around 1/2 inch apart form the star.

For the top row, stitch the entire star except the bottom part.


For the middle row, only stitch the sides.


And lastly for the bottom row, hand stitch the entire star except the top part.


Repeat step 5 for all eleven (11) stars, use image bellow for further guidance.  Almost there lovelies, you are almost there of having the Starfold pillow complete!


Step 6
Now take the two 17 1/2 by 11 1/2 pieces and attach the remaining two (2) stars  by following Step 4 and hand stitched them as instructed on Step 5. Place one star on each  17 1/2 by 11 1/2


Once these two pieces are complete, fold the top edges under by 1/2 inch and iron press, so  they will not unravel over time.  After this, if desire, straight stitch the folded edge.


Step 7
Start by laying the front piece of the pillow with the right side (stars) facing up and place the back panels on top with right side (starts) facing down. Pin all the pieces together and sew around with an 1/2 inch seam allowance.  Fold it over and you will have your Starfold Pillow with a secret overlapping opening on the back where you insert your pillow body!


And it's happening everyone! Your Starfold pillow is complete, make sure to showcase this stunner where it will receive the attentions that it deserves!


Happy Sewing!


Pat B. 


Tuesday, June 23, 2015

Mini Infinity Scarf Tutorial

Hello lovelies, 

I wanted to share with you a quick tutorial on a Mini Infinity Scarf featuring Shore Remains Algae voile from Etno Fabrics. Sometimes you just need an accessory to complete your outfit and this fast tutorial will help you with that ☺It will only take you 20 minutes to complete this project, leaving you with an adorable scarf. 


What you'll need:
►5/8 yards of Shore Remains Algae in Voile
►Sewing Machine
►Matching thread


Once you have your fabric folded (diagram 1), straight stitch all the way down the length of the scarf (right sides facing each other) using 1/2'' seam allowance. 


Turn the scarf right side out then match seams of both open edges and pin to match seams, try to sew all the way around while leaving a small opening were later you are going to blind hand stitch.  


And voila! your mini infinity scarf is complete! You can always alter the size of the scarf. In my case I use 20'' * WOF allowing me to turn it over twice, but you can make it bigger depending on the length that you want.


I hope you enjoy this mini tutorial!

xoxo

Pat

Thursday, July 31, 2014

Volant Table Runner Tutorial

Hello lovelies!

So wonderful to be blogging again! Lately, I've been so busy designing for my new collection and coordinating new projects [coming soon :)] that I couldn't find free time, but I did not forget about you all! and I promise I will be hanging out here more often with new goodies to share, like this one! I wrote the instructions for the Volant table runner for the release of NouvElle, and I want to share them with you. Here is the PDF.


The quilting was inspired by the New Look Coral print:


I hope you enjoy it and share your finished project with me!! I love seeing everything you lovelies make :)

Love and happy sewing,

Pat


10