Showing posts with label quilt. Show all posts

Monday, February 12, 2018

Tutorial Time! Rosemary's ♥ Quilt

Hello, hello everyone! 

I had been working so hard on my upcoming videos that I almost forgot to share this quick blog post! I must admit, I am having a blast filming and viewing the final result of my videos. Specially, I am so happy that I can connect with my lovely followers in another social platform, so excited for the upcoming videos! On today's post, I want to share this stunning Wall Art tutorial, isn't gorgeous? The Rosemary's ♥ quilt would be a perfect Vanlentine's Day project! So boho, so stylish, I love it and the best part is that it is a FREE pattern that you can download here!

http://liveartgalleryfabrics.com/wp-content/uploads/2017/11/rosemarys-heart-quilt-instructions.pdf


The Rosemary's Heart Quilt is so fun to make, you guys are going to enjoy every minute sewing this beauty. So everyone, get those weekly calendars out and add this project on your to do list!


I hope you enjoy making this wall art, and place this stunner center staged on your home which will be a perfect conversation starter! 

So...get ready...sew!

xoxo

Pat B. 

Friday, June 17, 2016

Intentional Piecing Book Review

Hello, hello!!!

So happy to have time to sit down and blog, it's been a minute and this one is good! A while back, I received my dearest Amy Friend latest book, Intentional Piecing, and I couldn't put it down.What  I love about this book is the countless projects (with instructions and paper piecing templates) that features. I really liked the Tumble 'Round quilt that made a mini version of it, using Amy's method.


Paper piecing, as Amy states, is a conscious, deliberate process of fabric selection to suit a particular pattern design or aesthetic. Each choice is considered in order to find the best use for a special piece of fabric or fabrics that will highlight a pattern design. If you are afraid of working with stripes and directional prints, then forget about, because this book will guide you in everything there is to know about paper piecing.


I fond this book encouraging me to make thoughtful cuts from my fabric stash and also considering the inclusion of salvages, border prints and precise piecing for graphics which will lead to an amazing project. Oh lovelies, make sure to get your hands on this amazing book, by clicking here, and start making out of this world projects. Thank you so much Amy for giving me a copy of your book, I truly enjoyed reading it ♥♥♥


xo,

Pat B.


Sunday, March 20, 2016

Ascent Table Runner

Hello, hello!!

As you all know, I love creating flying geese and from the longest time, I wanted to make a cute flying geese table runner. Now that I had the opportunity, I mixed Essentials II with The AGF Denim Studio! I am so excited for all of you to start sewing this cutie  ♥♥


Fabric Quantity
1 (one ) Fat Eight of ESS-II-351
1 (one ) Fat Eight of ESS-II-151
1 (one ) Fat Eight  of ESS-II-152
1 (one ) Fat Eight  of ESS-II-253
1 (one ) Fat Eight of ESS-II-355
1 (one ) Fat Eight  of ESS-II-154
1 (one ) Fat Eight of ESS-II-252
1 (one ) Fat Eight of ESS-II-150
1 (one ) Fat Eight of ESS-II-155
1 (one ) Fat Eight of ESS-II-353
1 (one ) Fat Eight of ESS-II-350
1 (one ) Fat Eight  of ESS-II-255
1 (one ) Fat Eight of ESS-II-153
1 (one ) Fat Eight of ESS-II-521
1 (one ) Fat Eight of ESS-II-354
1 (one ) Fat Eight of ESS-II-352
1 (one) yard of DEN-S-2001
3/₄ of DEN-P-1009

Cutting instructions
Cut 1 (one) 6’’ by 6’’ of ESS-II-351
Cut  1 (one) 6’’ by 6’’ of ESS-II-151
Cut 1 (one) 6’’ by 6’’  of ESS-II-152
Cut 1 (one) 6’’ by 6’’  of ESS-II-253
Cut 1 (one) 6’’ by 6’’ of ESS-II-355
Cut 1 (one) 6’’ by 6’’ of ESS-II-154
Cut 1 (one) 6’’ by 6’’ of ESS-II-252
Cut 1 (one) 6’’ by 6’’ of ESS-II-150
Cut 1 (one) 6’’ by 6’’ of ESS-II-155
Cut 1 (one) 6’’ by 6’’  of ESS-II-353
Cut 1 (one) 6’’ by 6’’ of ESS-II-350
Cut 1 (one) 6’’ by 6’’ of ESS-II-255
Cut 1 (one) 6’’ by 6’’ of ESS-II-153
Cut 1 (one) 6’’ by 6’’ of ESS-II-521
Cut 1 (one) 6’’ by 6’’ of ESS-II-354
Cut 1 (one) 6’’ by 6’’ of ESS-II-352
Cut 48 (forty eight) 3¼ by 3¼  of  DEN-S-2003
Cut 1 (one) 5‘’ by 16.5’’  of  DEN-S-2001
Cut 1 (one) 5‘’ by 21.5’’  of  DEN-S-2001
Cut 1 (one) 5‘’ by 5.5’’  of  DEN-S-2001 
Backing
Cut 1 (one) 12 by 23.5 of DEN-P-1009

Step 1 
Let's begin by creating the flying geese. There will be a total of 17 flying geese for this mini quilt. For the purpose of this tutorial I will explain how to create the flying geese with only ESS-II-151.
Grab the 6’’ by 6’’ of ESS-II-151 and 2 (two) 3¼ by 3¼  of  DEN-S-2003 and place them as instructed below. Later trace a line in the middle of the piece and start stitching 1/4 on each side (dotted line on image below). Once that's complete, cut in the middle of the piece.


You will have two pieces but for this tutorial we will only use one. You can set the extra aside. Flip the DEN-S-2003 upwards to have a heart-looking piece. 


Now take 1(one) 3¼ by 3¼  of DEN-S-2003 and place it in the middle. Trace a line in the middle of the piece and start stitching 1/4 on each side (dotted line on image below). Once that's complete, cut in the middle of the piece. Now you will have two pieces, again for this quilt we will be using just one piece, you can set the extra aside. Flip denim upwards and press.


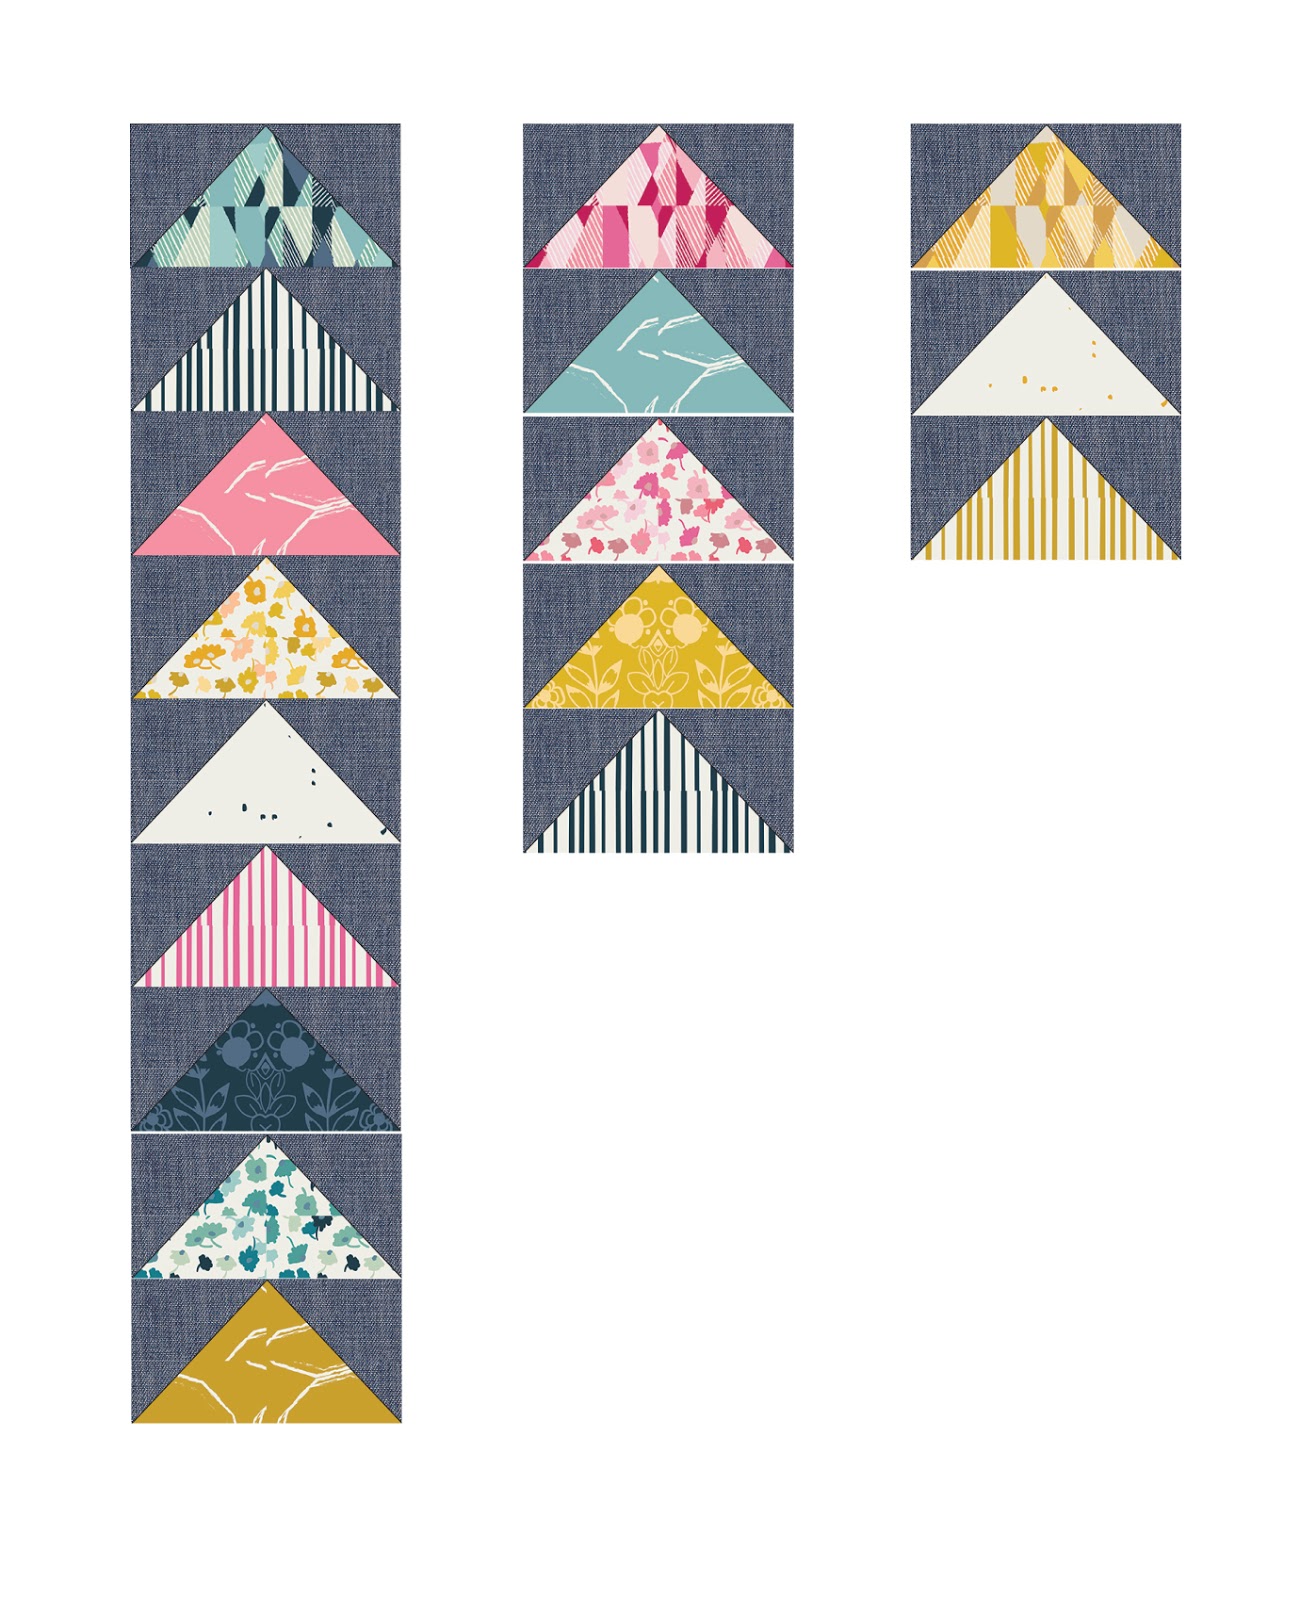
Repeat Step 1 17 (seven-teen) times. But for ESS-II-152 we will keep 2 flying geese, not like with the other fabrics that we only kept 1. Once all of the flying geese are completed, start attaching them as instructed in the image below. Remember to keep the pattern explained on the image.

Step 2  
Now that all the pieces are completed take the Denim cut pieces so you can attach them to the flying geese.
For better understanding, rows are divided in ABC.
For Row A: Take the  take the  5'' by 5.5''  of  DEN-S-2001 and place it below flying geese (see image below)
For Row B: Take the  5'' by 16.5''  of  DEN-S-2001 and place it above the flipped flying geese
For Row C: Take the 5'' by 21.5''  of  DEN-S-2001 and place it below the flying geese


Lastly, sew Rows ABC together and voila! You have completed the Ascent Mini quilt! Yei ☺


Quilt Assembly
Place BACKING FABRIC on a large surface wrong side up. Stretch it with masking tape against that surface.
Place BATTING on top of backing fabric.
Place TOP on top of the batting with right side facing up. Smooth away wrinkles using your hands.
Pin all layers together and baste with basting thread, using long stitches. You can also use safety pins to join the layers. 
Machine or hand quilt starting at the center and work-ing towards the corners. Remember that quilting motifs are a matter of personal preference. Have fun choosing yours!
After you finished, trim excess of any fabric or batting, squaring the quilt to proceed to bind it. 
Binding
Cut enough strips 1½" wide by the width of the fabric I to make a final strip 280" long. Start sewing the binding strip in the middle of one of the sides of the quilt, placing the strip right side down and leaving an approximated 5" tail. Sew with ¼" seam allowance (using straight stitch), aligning the strip’s raw edge with the quilt top’s raw edge. 
Stop stitching ¼" before the edge of the quilt (DIA-GRAM B 1). Clip the threads. Remove the quilt from under the machine presser foot. Fold the strip in a motion of 45° and upward, pressing with your fingers (DIAGRAM B2). Hold this fold with your finger, bring the strip down in line with the next edge, making a horizontal fold that aligns with the top edge of the quilt (DIAGRAM B3). Start sewing at ¼" of the bor-der, stitching all the layers. Do the same in the four corners of the quilt.
Stop stitching before you reach the last 5 or 6 inches. Cut the threads and remove the quilt from under the machine presser foot. Lay the loose ends of the binding flat along the quilt edge, folding the ends back on themselves where they meet. Press them together to form a crease. Using this crease as the stitching line, sew the two open ends of the binding with right sides together (you can help yourself marking with a pencil if the crease is difficult to see). 
Trim seam to ¼" and press open. Complete the sewing. Turn binding to back of the quilt, turn raw edge inside and stitch by hand using blind stitch.


Thursday, June 11, 2015

Same Block, Different Looks

Hello lovelies!

A while ago I made a blog post for AGF called, One Block Three Ways and I wanted to do it again on my blog. I wanted to show the different ways one single quilt block can have with different fabric selections. Sometimes we just get stuck in one style and we forget that we can mixed and match with different fabrics, and have a stunning result. 
This time around I made two Pinwheel quilt blocks (being one of the easiest to make because it only involves half square triangles!), giving them two different looks, Ethnic and Romantic.

Ethnic

For Ethnic, I used Etno Fabrics'  Dreams of Amina, Shore Remains Algae and Macchiato Pure Elements from Art Gallery Fabrics. If you wan to go for a more Ethnic look on your quilt, make sure to choose light and dark pure colors that will complement the main fabric which you had selected for central focus.   


I like to get inspired in everything I do and visualizing my inspiration is a must, so I created this little mood board with inspirational images that will help me get inspired and I hope it helps you as well☺


Here is a close up of the Ethnic quilt block. See how the soft Mocchiato perfectly complements Dreams of Amina and Shore Remain Algae, it truly makes this block stand out.


Romantic

For Romantic I used Rock 'n Romance. I wanted to give romance an edge with a bit of Rock n' Roll and what a great way to do so than with Rock 'n Romance.
For this block I used Wild Heart Spirited, Femme Metale Steel and Art Gallery Fabrics' Verve Violet. Romance is all about sweetness and softness, but with the bit of Rock 'n Roll I added to it, I had to add a strong yet soft background color and AGF's Verve Violet was the way to go choice. 

And here is some of my inspirational pictures to help me get inspired when choosing colors ☺


A close up of this Romantic quilt block. The fun part about it is that this block does not look the same while using different fabrics. You will have two completely different quilts using the same quilt block! How cool is that??  


I wanted to prove my point by using a traditional quilt block. If you choose your fabric carefully and have in mind what sort of quilt you want to achieve (Ethnic, Romantic, Modern...etc) you can make something amazing and can turn this traditional block in a very stylish one ☺


xoxo

Pat.

Tuesday, December 30, 2014

ETNO Flying Geese Table Runner

Hi! How was your Christmas Holiday super looong weekend? I hope you have had lots of happy family gatherings with your loved ones. Christmas is always so full of a magical spirit, don't you think? Our celebration was so good! We were 6 at the table and my mother was the queen! My husband, son, my sister and me felt this holiday very special for having her, at her 87 years of age, strong and so happy! 


I was working lots these days spent at home... I didn't go to work last Friday, so this holiday felt almost as a vacation! Since I had more time to sew, my priority was to finish the runner made with the new flying geese method I shared with you on a previous post here

My new ETNO collection ships to stores late January and I think this table runner can be the first sample for you to see my fabrics in action!

I had the top ready sewn days ago, so the only thing was to decide how to quilt it. The order of the day at my sewing room was to relax and have fun with straight line quilting! 
etnofabrics quilt quilting patbravo ethnicfabric

First I thought about straight vertical quilting, but looking at the triangles I had the impulse to do straight lines in angle that will replicate the geese. I love how it came out! Working with my Bernina walking foot and the marking it has, I went for 1/2" seams.


There was a moment that I was so excited to see how it was looking that I did a small section in the center of the runner reducing the spacing to 1/4" apart that I'm showing on the pic below. 


Oh... the magic of quilting... These are the moments that I enjoy the most!!


Because I'm only working with strike offs (the first sample the mill sends me to correct the final production) I'm using all the scraps left from the top cutting; so I decided to put them to good use on the back, combining them with stripes of the AGF "Square Elements" in Lemon and my beloved "Wanderlust" in Luna from the INDIE collection I've designed some time ago. Scrappy scrappy!


On the binding, I've combined a creamy grey with small sections of teal from the AGF "Pure Elements" line of solids. I love the pop and modern effect of these kind of combinations!


Hope you liked it! I'm crazy in love with this runner, and can't wait until my new ETNO line gets shipped to stores late January so you can put your hands on it! What's going to be the order of the day at your sewing room?

Thanks for stopping by today! Xo, Pat

Thursday, November 20, 2014

10 Different Ways To Cut A Fat Quarter


Hi fat quarter friends... I'm sure many of us can find several ways to give a fat quarter a good use. Look at all the different squares you can cut from it! Amazing, right? Hope you like it and... feel free to share it with your friends!


XO, Pat

Thursday, July 31, 2014

Volant Table Runner Tutorial

Hello lovelies!

So wonderful to be blogging again! Lately, I've been so busy designing for my new collection and coordinating new projects [coming soon :)] that I couldn't find free time, but I did not forget about you all! and I promise I will be hanging out here more often with new goodies to share, like this one! I wrote the instructions for the Volant table runner for the release of NouvElle, and I want to share them with you. Here is the PDF.


The quilting was inspired by the New Look Coral print:


I hope you enjoy it and share your finished project with me!! I love seeing everything you lovelies make :)

Love and happy sewing,

Pat


Saturday, April 12, 2014

Quilt accidents do happen


Hi!

A few weeks ago could finally start this table runner made with my Rapture fabrics, and God knows I would have liked to finish it in 2 days at the most! With Quilt Market getting closer on the horizon, the perspectives of finishing were washing away little by little. So I took the decision to be patient and work with the small amounts of time I could find. Anyways I wanted to take couple of pics from the process.


After being pieced, quilted, trimmed and ready to be bound, I just found out that the width of the runner was 12". I went to my kitchen table to try it and looked so thin!! The first seconds were a feeling of panic...  Luckily for me, I didn't add any backing yet :)


Thinking about a quick and easy solution for a couple of days, I managed to sew (side to side) two strips of batting 2" wide on each side with a zig-zag stitch (4.0 width). I thought that if it crossed the finished side of the runner just by a little, then I could piece a 2 1/4" of fabric on top, and it wouldn't be visible when I pressed it open (I was sewing with a 1/4" seam).


It actually worked! And... I could add a contrasting floral fabric as a border. Then, I decided to follow the same steps adding strips on the extremes. For the backing, I've selected two different fabrics joined in stripes (to have a reverse side I could use). Then I tried to mimic the straight quilting I did for the body of the runner.


The binding choice was a modern geometric dot that could look good against the floral. Retro Pop Mint, from my Carnaby St. collection .


I love how the binding looks! Of course... by hand (one my favorite steps)


Pure joy when I used for the first time!

Quilt accidents do happen, but nothing that a big dose of a desire to make it work and another one of love can't solve :)

Did you happen to have a similar moment of panic as I did?

Xo, Pat

Friday, December 6, 2013

Aurifil Block of the Month with Rock 'n Romance

Hello everyone! I just can't believe that it's December and the very last Aurifil Rock 'n Romance quilt block has been sewn.

Here are the last four blocks of the year!


If you missed it, here is the 1st group of blocks and the 2nd group. All 12 blocks are just amazing! Thank you 2013 Auriful Design team for your gifted sewing talents and making wonderful blocks with Rock 'n Romance. I cannot wait to see the finished quilt! For a sneak peek of the quilt, go to the AURIbuzz blog to see that layout, by Pat Sloan.


You can also stop by the AURIbuzz blog to to read the lovely interview Pat Sloan did about me :)


Also, you have until Monday to enter my Rapture fat quarter bundle giveaway. Good luck!

Happy sewing and have a great weekend :)

Tuesday, November 12, 2013

I made the cover!

Hi everyone!

I wanted to take a moment and share with you the November-December 2013 issue of Generation Q magazine. I made the cover! {big smile}


I'm so honored that Jake and Melissa at Generation Q wanted to interview me! And I'm overjoyed to be featured on the cover!


I received a copy of the magazine at the Fall Quilt Market and I had a chance to pose for a photograph with the handsome man on the cover with me, my husband Walter.

Here is a sneak peek of my interview.


I shared a look inside my home; my family haven. My home reflects my love of color, history and design. I have so many goodies in nooks and crannies of my home. I had to quickly clean things up a little bit for the photoshoot, LOL!


Here I am in front of my special inspiration board where I pin up magazine clippings. In the magazine there is also a look inside my studio and a free quilt pattern for my Summerlove quilt.

I love the way the interview came out! It's something that I'll treasure forever. Thanks Generation Q for letting me share my story with others.

xoxo,

Monday, August 5, 2013

Aurifil Block of the Month with Rock 'n Romance

Hey everyone!

I'm am so honored and excited that my fabric line, Rock 'n Romance, is being used for the 2013 Aurifil Design Team! Twelve lovely designers are creating awesome blocks. Each month there will be a new quilt block by one of the designers. I already shared with you the first four designers in a previous blog post. Now here are designers five through eight!


Designers 5-8 are:

Each block is unique and they are all so great! There are four designers left. I can't wait until December to see all of the blocks!

Happy sewing!

Love,
10