Here is another stunning and easy projects for you to do featuring Essentials II Fabrics ☺, have fun sewing this cutie!
Fabric Requirements 2 1/2” x 10 1/2” strips from Fabric A-F
Fabric A- ESS - II- 152
Fabric B- ESS - II- 153
Fabric C- ESS - II- 155
Fabric D- ESS - II- 150
Fabric E- PE- 434
Fabric F- PE- 465
Fabric G- DEN-L-4000- Fat Eighth
Fabric H- DEN-S-2003- Fat Eighth
Fabric I- DEN-S- 2001- Fat Eighth
Cutting Directions
Sew at 1/4” seam allowance with right sides together.
One (1) 2 1/2” x 10 1/2” strips from Fabric A-G
One (1) 6 1/2“ x 7 1/2” rectangle from Fabric G
One (1) 6 1/2“ x 14 1/2” rectangle from Fabric H
One (1)- 6 1/2” square from Fabric I
Step 1: Sewing the Strips
Sew 2 1/2” x 10 1/2” strips together in the following order: A, B,E,C,F,G,and D
Step 2: Pocket
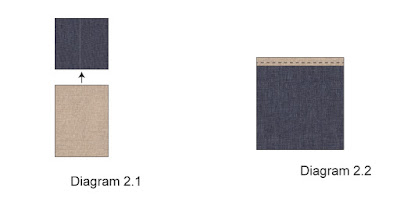
Take a 6 1/2” square from Fabric I and sew it to the 6 1/2” side of a 6 1/2” x 7 1/2” rectangle from Fabric G with right sides together.(Diagram 2.1)Flip fabrics so wrong sides are touching and match the other 6 1/2” ends of each piece together. This will create a faux binding at the top of your pocket! Topstitch at 1/8” from the seam to secure
pocket pieces.
Step 3: Sew the Front Placemat
Take pocket and pin on the bottom corner of a 6 1/2” x 14 1/2” rectangle from Fabric H. (Diagram 3)
Take piece made in Diagram 3 and sew it to your strips. (Diagram 4)
Take a piece of batting a little bit bigger then your front placemat and pin together. Quilt as desired! I quilted straight horizontal lines at different widths.
Once you front placemat is quilted it’s time to square off your piece. Use your front placemat as a template to cut ou the backing in Fabric J. Place right sides together and sew around the entire piece at 1/4” making sure to leave a small unsewn portion to flip your place mat to the right side of the fabric.
Flip your placemat through and hand sew unsewn portion closed!


Interesting post within your sharing. Thank you very much.
ReplyDeleteBuy Wardrobe Online | Buy Step Ladder Online
Appreciate your bllog post
ReplyDelete