Showing posts with label Essentials II. Show all posts

Tuesday, April 26, 2016

The Minis are Unstoppable

The Minis blog tour started yesterday and the projects are just to die for! I am super happy every time I see my inbox with the stunning mini quilts, ladies....you are all so talented! I wanted to make a quick blog post with some of the minis that had been released during these two days. 

Laura Piland created this beautiful butterfly quilts, and I love it!

Amazing quilting, and this close up is so yummy!
 
Katie went all out making not only one, but two mini quilts!


 And the detail on the quilting is incredible. These minis are so cute, I seen them in a little girl's bedroom and decor ♥


  Courtney just made me swoon with this tiny cutie! Great way of mixing both color ways!


More Azur color ways are coming in minis! Stacy made this mini quilt and it's so cute! Oh boy, these minis are playing with my heart ♥♥


Stay tuned for the rest of the bloggers, the minis are incredible and this is just the beginning of the tour! I can't wait to see the other minis....so thrilled!!

xoxo

Pat.  


Monday, April 25, 2016

The Minis Blog Tour


Hello everyone!

Today we kick start The Minis Blog Tour! I am so happy and filled with excitement. I wanted to make this blog tour for the longest and it's finally happening. I had an idea of combining #DareFabrics with #EssentialsIIFabrics and see what awesome project comes out of those two. But, how about making that project with talented makers from around the globe? And well...The Minis Blog tour came to life! Since I posted the IG Call for Maker, I've been receiving countless of emails from talented makers. Thank you all for wanting to be part of the fun and I am super happy to have you all beauties on board, this is going to be a fun month ☺☺

So...let's get started! Below are the 30 talented makers (2 of the 30 posting daily ☺) that are tacking part of this tour, each site will be linked daily with their post project.

Monday April 25
Laura Piland

Courtney Zadik

Tuesday April 26
Katie Skoog

Stacey Gibson

Wednesday April 27
Amanda Woodruff

Jessica Stewart

Wednesday April 28
 Erin Cox

Anjeanette Klinder

Friday April 29
Aimee Leptick

 Sharla Krenzel

Monday May 2
Christine Blessing

Cat Noonan

Tuesday May 3
Sarah Overton

Jyoti Haeusler
Sewn Modern Crafts

Wednesday May 4
Faith Essenburg

Lesley Storts

Thursday May 5
Ellen Ault

Michelle Bartholomew 


Friday May 6
Kate Basti

Kate Lyons

Monday May 9
Cindy Guch

Name: Lucy

Tuesday May 10
Marija Vujcic

Isabel Kelly
Lamb and Wolfie

Wednesday May 11
Samantha Green

Tara J Curtis

Thursday May 12
Samantha Dorn

Maja Wlusek

Friday May 13
Jemima Flendt
Tied With a Ribbon

Kerry Smith
Thats Sew Kerry

So thrilled and excited to see everyone's mini quilt!


xoxo,


Pat,

Tuesday, March 22, 2016

Essentials II LookBook Released!

So, so happy!

I had so much fun creating these adorable projects for Essentials II! I hardly had time to sleep, but when you do what you love.......everything is worth it. This collection has three tonal color stories with my signature fresh, bright tones, and trendy patterns that range from innovative textures to graphic florals. Art Gallery Fabrics just released the Lookbook for my collection and it’s filled with so many inspirational FREE projects. I’m sure you’ll enjoy it!


I’m currently obsessed with "Mini Quilts." They are the cutest! I just had to make some for my lookbook! What do you think? I am in love with these beauties because they are the perfect home décor accessory.


But my true love is The A Surge quilt. You all know due to my constant IG posts, of this stunner. This quilt is a spectacle for any quilt lover! Make sure to check my Crafty shop when you can get your hands on this cutie's instructions.


Essentials II is all you need for spring, the hues, shapes and designs fit perfectly with the season. Can you imagine your dinner table ready for spring? I know I can. These placemats are a great way to add personality to the dinner table and will be perfect for Easter Sunday as well!


I am so thankful to see all the projects you have been sharing on Instagram, it truly motivates me to continue creating for all of you! What a great way to start spring than with Essentials II? Make sure to check out my Pinterest board with many projects ideas and more ☺


Happy sewing!


Pat B.

Monday, March 21, 2016

At Ease Placemat Tutorial

Hello lovelies!

Here is another stunning and easy projects for you to do featuring Essentials II Fabrics ☺, have fun sewing this cutie! 


Fabric Requirements 2 1/2” x 10 1/2” strips from Fabric A-F
Fabric A- ESS - II- 152
Fabric B- ESS - II- 153
Fabric C- ESS - II- 155
Fabric D- ESS - II- 150
Fabric E- PE- 434
Fabric F- PE- 465
Fabric G- DEN-L-4000- Fat Eighth
Fabric H- DEN-S-2003- Fat Eighth
Fabric I- DEN-S- 2001- Fat Eighth 

Cutting Directions
Sew at 1/4” seam allowance with right sides together. 
One (1) 2 1/2” x 10 1/2” strips from Fabric A-G
One (1) 6 1/2“ x 7 1/2” rectangle from Fabric G
One (1) 6 1/2“ x 14 1/2” rectangle from Fabric H
One (1)- 6 1/2” square from Fabric I

Step 1: Sewing the Strips

Sew 2 1/2” x 10 1/2” strips together in the following order:  A, B,E,C,F,G,and D


Step 2: Pocket
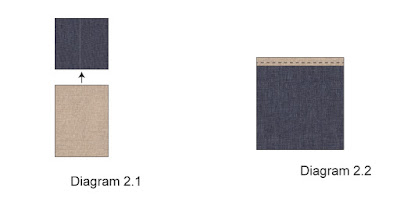
Take a 6 1/2” square from Fabric I and sew it to the 6 1/2” side of a 6 1/2” x 7 1/2” rectangle from Fabric G with right sides together.(Diagram 2.1)
Flip fabrics so wrong sides are touching and match the other 6 1/2” ends of each piece together. This will create a faux binding at the top of your pocket! Topstitch at 1/8” from the seam to secure
pocket pieces.


Step 3: Sew the Front Placemat
Take pocket and pin on the bottom corner of a 6 1/2” x 14 1/2” rectangle from Fabric H. (Diagram 3)


Take piece made in Diagram 3 and sew it to your strips.  (Diagram 4)


Take a piece of batting a little bit bigger then your front placemat and pin together. Quilt as desired! I quilted straight horizontal lines at different widths.
Once you front placemat is quilted it’s time to square off your piece. Use your front placemat as a template to cut ou the backing in Fabric J.
Place right sides together and sew around the entire piece at 1/4” making sure to leave a small unsewn portion to flip your place mat to the right side of the fabric.
Flip your placemat through and hand sew unsewn portion closed!


Friday, March 18, 2016

Huddle Table Runner

Another lovely project! I had so much fun making this table runner that of course I had to share it with you. It is super easy and fast, so get ready....set....sew! ☺


Cutting Instructions
Cut 10 (ten) 4’’ by 4’’ ESS-II-151 (Fabric A)
Cut 6 (six) 4’’ by 4’’ ESS-II152 (Fabric B)
Cut 6 (six) 4’’ by 4’’ ESS-II153 (Fabric C)
Cut 4 (four) 4’’ by 4’’ ESS-II150 (Fabric D)
Cut 12 (twelve) 4’’ by 4’’ PE-436 (Fabric E)

Fabric Quantity
1 Fat Quarter of  ESS-II151
1 Fat Eight of ESS-II-153
1 Fat Eight of ESS-ii-152
1 Fat Eight of ESS-II-150
1 Fa Quarter of PE-436

Step 1
Now that you have all your pieces cut, start by sewing them by the row combination below. See image for further assistance.

Row A: CDC
Row B: ABCBA
Row C: EABSBA
Row D: EEABB
Row C: EEABB
Row F:EABSBA
Row G: ABCBA
Row H: CDC

 Step 2
Once all the pieces are sewn, let's start attaching the rows together. You are going to have two extra pieces of Fabric D. Those two will be added at each end of the quilt top. Sew them together and press seam allowance upwards.  See image for further assistance.


Finally you will have the quilt top looking like this.

Step 3 
For backing, I used ESS-II-154. Due to the eccentric shape of our mini quilt, I traced the shape on top of the backing leaving a 1/4'' extra for seam allowance. Sew right sides together leaving a 5'' opening to turn the quilt over. Once that's over, 

Quilt Assembly
Place BACKING FABRIC on a large surface wrong side up. Stretch it with masking tape against that surface.
Place BATTING on top of backing fabric.
Place TOP on top of the batting with right side facing up. Smooth away wrinkles using your hands.
Pin all layers together and baste with basting thread, using long stitches. You can also use safety pins to join the layers. 
Machine or hand quilt starting at the center and work-ing towards the corners. Remember that quilting motifs are a matter of personal preference. Have fun choosing yours!
After you finished, trim excess of any fabric or batting, squaring the quilt to proceed to bind it. 
Binding
Cut enough strips 1½" wide by the width of the fabric I to make a final strip 280" long. Start sewing the binding strip in the middle of one of the sides of the quilt, placing the strip right side down and leaving an approximated 5" tail. Sew with ¼" seam allowance (using straight stitch), aligning the strip’s raw edge with the quilt top’s raw edge. 
Stop stitching ¼" before the edge of the quilt (DIA-GRAM B 1). Clip the threads. Remove the quilt from under the machine presser foot. Fold the strip in a motion of 45° and upward, pressing with your fingers (DIAGRAM B2). Hold this fold with your finger, bring the strip down in line with the next edge, making a horizontal fold that aligns with the top edge of the quilt (DIAGRAM B3). Start sewing at ¼" of the bor-der, stitching all the layers. Do the same in the four corners of the quilt.
Stop stitching before you reach the last 5 or 6 inches. Cut the threads and remove the quilt from under the machine presser foot. Lay the loose ends of the binding flat along the quilt edge, folding the ends back on themselves where they meet. Press them together to form a crease. Using this crease as the stitching line, sew the two open ends of the binding with right sides together (you can help yourself marking with a pencil if the crease is difficult to see). 
Trim seam to ¼" and press open. Complete the sewing. Turn binding to back of the quilt, turn raw edge inside and stitch by hand using blind stitch.


Thursday, March 17, 2016

Arise Runner

Hello everyone!

This is one of the easiest runner ever! The most complicated part I think is cutting, well not complicated, time consuming. This is a perfect piece for your living room or bedroom. I have mine on my living, beautifully displayed on my sofa.  Have sewing this beauty! The directions are the easiest! Little new approach I'm tacking for easy projects, let me know if you like it ☺


Runner size: 20” x 60”


Fabric Quantities
ESS-II-252 ¼ yd - Fabric A
ESS-II-152 ¼ yd - Fabric B
ESS-II-355 ¼ yd - Fabric C
ESS-II-352 ¼ yd - Fabric D
ESS-II-155 ¼ yd - Fabric E
ESS-II-255 ¼ yd - Fabric F
ESS-II-354 ¼ yd - Fabric G

 Cutting Instructions
 Cut 2 (two) 2 ½” x WOF of  Fabric A
  • Then sub-cut into ten 4 ½” squares
 Cut 2 (two) 2 ½” x WOF of Fabric B
  • Then sub-cut into ten 4 ½” squares 
 Cut 2 (two) 2 ½” x WOF of Fabric C
  • Then sub-cut into eleven 4 ½” squares 
 Cut 2 (two) 2 ½” x WOF of Fabric D
  • Then sub-cut into thirteen 4 ½” squares 
Cut 2 (two) 2 ½” x WOF of Fabric E
  • Then sub-cut into fifteen 4 ½” squares
Cut 2 (two) 2 ½” x WOF of Fabric F
  • Then sub-cut into sixteen 4 ½” squares 
 Cut 9 (nine) 2 ½” x WOF of Fabric G
  • Then sub-cut into eleven 4 ½” squares 


Step 1

TIP: Have all of your cut pieces separated by fabric.

Now this is the fun part, start creating each row. All the the square sizes are the same, so there will be no error in placing the correct size with its respective square. So, use my TIP (explained above) for easier construction of each row (a design wall will be very useful for this project) Follow the images below for direction of fabric placement for each row


Once all of the rows are completed start attaching them together, use the diagram below for directions on design. Like I said before a design wall is a good thing to have, if you don't have one, the floor will do ☺


Didn't I say this table runner is the easiest! So fun and easy to do. 


Happy sewing!

xoxo 

Pat B. 


10