Showing posts with label Carnaby Street. Show all posts

Saturday, April 12, 2014

Quilt accidents do happen


Hi!

A few weeks ago could finally start this table runner made with my Rapture fabrics, and God knows I would have liked to finish it in 2 days at the most! With Quilt Market getting closer on the horizon, the perspectives of finishing were washing away little by little. So I took the decision to be patient and work with the small amounts of time I could find. Anyways I wanted to take couple of pics from the process.


After being pieced, quilted, trimmed and ready to be bound, I just found out that the width of the runner was 12". I went to my kitchen table to try it and looked so thin!! The first seconds were a feeling of panic...  Luckily for me, I didn't add any backing yet :)


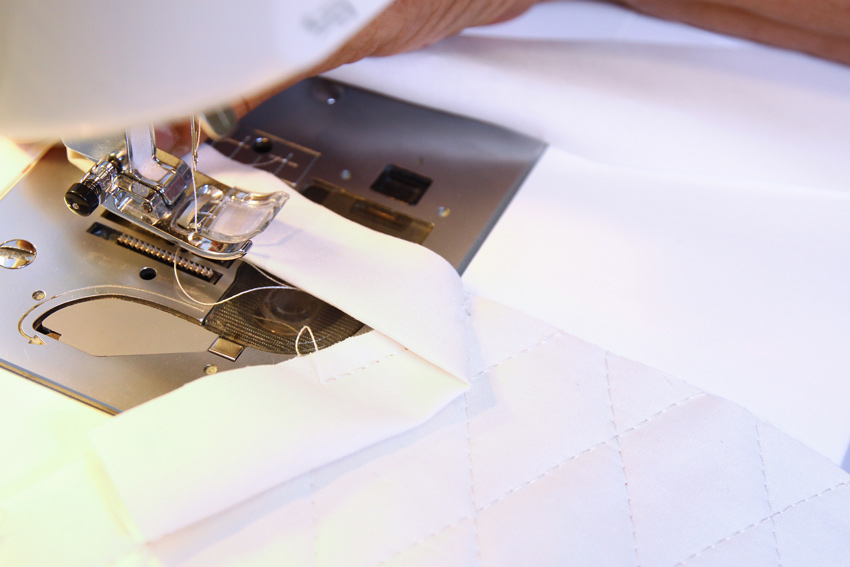
Thinking about a quick and easy solution for a couple of days, I managed to sew (side to side) two strips of batting 2" wide on each side with a zig-zag stitch (4.0 width). I thought that if it crossed the finished side of the runner just by a little, then I could piece a 2 1/4" of fabric on top, and it wouldn't be visible when I pressed it open (I was sewing with a 1/4" seam).


It actually worked! And... I could add a contrasting floral fabric as a border. Then, I decided to follow the same steps adding strips on the extremes. For the backing, I've selected two different fabrics joined in stripes (to have a reverse side I could use). Then I tried to mimic the straight quilting I did for the body of the runner.


The binding choice was a modern geometric dot that could look good against the floral. Retro Pop Mint, from my Carnaby St. collection .


I love how the binding looks! Of course... by hand (one my favorite steps)


Pure joy when I used for the first time!

Quilt accidents do happen, but nothing that a big dose of a desire to make it work and another one of love can't solve :)

Did you happen to have a similar moment of panic as I did?

Xo, Pat

Thursday, August 1, 2013

From me with eLove! August 2013

Happy August!

I receive so many lovely complements of how you enjoy my fabrics. So I thought, "what is another way that I can share my fabrics with you?" And it came to me... digital backgrounds! I'm super exited about it!

I've made two of my popular Carnaby Street fabrics into graphic digital backgrounds for your desktop, iPad and iPhone! I also made them with and without an August 2013 calendar.


Ladylike Black Tea
with calendar
1280×800 | 1440×900 | 1680×1050 | 1920×1200 | 2560×1440 | iPad

without calendar
1280×800 | 1440×900 | 1680×1050 | 1920×1200 | 2560×1440 | iPad | iPhone | iPhone5


Go-Go London Lustrous
with calendar
1280×800 | 1440×900 | 1680×1050 | 1920×1200 | 2560×1440 | iPad

without calendar
1280×800 | 1440×900 | 1680×1050 | 1920×1200 | 2560×1440 | iPad | iPhone | iPhone5


I hope you enjoy the digital backgrounds! I'll have new ones to share in September :)

Love,

Monday, July 15, 2013

The Groovy Instagram Contest is Now Over

Hello everyone! I hope you all are enjoying your summer. I can't believe that we're midway through July already! Thank you for the 85 entries to my first ever Instagram contest! I've enjoyed the last two weeks admiring all of your sewing projects made with my fabrics.

Last week I announced the first two winners. Without further adieu, are the final two winners are:
Congratulations @suchasewandsew and @chelseapinkfig! They each won one 1/2 yard bundle of the Carnaby Street fabrics in the Cool Peace colorway.


The detail and craftsmanship of @suchasewandsew's fabric star with my Indie fabric is just simply wonderful. This Carnaby Street hippie maxie dress by @chelseapinkfig screams summer fun! I need an adult version myself.

Thanks again to all who participated! You can see all of the entries here. And please visit my Flickr group, Sew Pat Bravo, to upload your Pat Bravo sewing projects.

Happy sewing!
 

Monday, July 8, 2013

And the winners are...

Hello everyone! I hope you all had a relaxing and festive 4th of July weekend! I'm just getting back from a week in the Bahamas with my ever so wonderful husband. I enjoyed looking at all of the #sewpatbravo Instagram entries while I was on the beach daydreaming. They are all SO WONDERFUL!

Without further adieu, the first two winners are:
Congratulations @sew_christy and @alyfrog, who both used fabrics from my Indie collection! They each won one 1/2 yard bundle of the Carnaby Street fabrics in the Cool Peace colorway.

I'm in awe by @sew_christy's massive queen sized quilt. I know that had to take forever to sew. And @alyfrog's girl's tunic is just too precious.


The contest is NOT OVER! You have until July 15th to Instagram a photo of your projects using Pat Bravo fabrics.

This is how you can play:
1.  Follow me, @patbravodesign, on Instagram.

2.  Upload a pic to Instagram of your sewing project with Pat Bravo fabrics. Don't forget to USE THE HASHTAG #sewpatbravo when you post your photo. Your sewing project can be complete, or a work in progress stage.

Here is a list of my fabrics for your reference.

3.  There will 4 winners total. I'll pick the next 2 winners, on July 16th, based on creativity. (All previous entries are still eligible.)

4. Contest runs July 1 - July 15, 2013.

Feel free to join my Flickr group, Sew Pat Bravo, and post your image there too.

Good luck! I can't wait to see more! Also check my FaceBook page for daily posts of my favorite entries.

Until next time, xoxo...

Monday, July 1, 2013

A Groovy Instagram Contest

Hello everyone!

It's July 1st and it's almost time for the 4th of July festivities! So to celebrate, I'm having my very first Instagram contest!


This is how you can play:
1.  Follow me, @patbravodesign, on Instagram.

2.  Upload a pic to Instagram of your sewing project with Pat Bravo fabrics. Don't forget to USE THE HASHTAG #sewpatbravo when you post your photo. Your sewing project can be complete, or a work in progress stage.

Here is a list of my fabrics for your reference.

3.  There will 4 winners total. I'll pick 2 winners per week base on creativity.

4. Contest runs July 1 - July 15, 2013.

Feel free to join my Flickr group, Sew Pat Bravo, and post your image there too.

Good luck! I can't wait to see what you're going to make with my fabrics!

xoxo,

Wednesday, June 26, 2013

Sewing Project Roundup

Hello lovelies!

I hope you all had a wonderful weekend, quilting, sewing, and crafting! This weekend I decided to go thrifting for a few pieces of furniture and decor to add to my studio and sewing room. I love to find all sorts of antiques and combine them with modern pieces to add that touch of modern elegance to my home. I've also put the finishing touches to my next collection, which I promise to show you a sneak peek in the up and coming weeks!

One of my favorite things about designing collections is imaging what everyone else will do with them. I love designing fabrics, and seeing all of the projects people make with them is a true joy for me. So for today's post, I'm showcasing a few projects that I just adore featuring my latest collections!

 Mommy and Me tunic tops, by Jana. | Over-sized floor cushion, by Erin. | Quilt by, Kimberly Jolly, Quilty magazine, Jul/Aug 2013. | Groovy Carnaby Street quilt by, Quilt Jane. | Upholstered chair makeover, by Amanda Walker, sewmag.co.uk, June 2013. | The Missouri Star quilt block, by Debra, Quilt  magazine, Feb/Mar 2013.

 Cozy tea time trivet, by Rashida Coleman-Hale. | Lavender tea cups tutorial, by Katarina Roccella. | Little girl fashions, by Katarina Roccella.


 Fusion Dress pattern, by Pat Bravo, Sewing World magazine, June 2013. | Fresh Fraise quilt, by Michelle Marving, Quilters Companion, No.61.

I hope all these sensational projects have inspired you to make some of your own! If you have anything made with my fabrics, please feel free to add them to my Flickr group :)

Who knows? Maybe your project will be in my next post! Until next time...

Happy sewing!


Friday, June 21, 2013

Carnaby Crossing Placemats

Happy 1st day of summer everyone!

I hope you are planning to have a wonderful time vacationing or spending time with the family, making all sorts of crafts and projects together! I've been up to a few projects of my own, working with my beloved BERNINA 780 and the tons of new ideas I've had since coming home from Market.

With summer already here, I thought, wouldn't it be nice to spruce up the kitchen and dining room area for some fun, summer entertaining! I know that every now and then, my family decides to come over and visit sunny Florida with all its tropical beaches and delicious piña coladas!

So, to add a little more color to our dining table, I put a different twist on the usual placemats using selvedges from my very own fabric collections.


This is truly a fun way to add a little touch of color and design to regular placemats. Its fresh, modern... And its even fast and easy to do!


For the placemats, I used Art Gallery's Pure Elements solids and Go-Go London Lustrous from my Carnaby Street collection for the binding. For the selvedges, I used a mixture of my favorite color registration marks from various prints and placed them on top of each other, playing with different angles and directions.


What I truly love about the BERNINA 780 is that it lets me sew at ease. The presser foot automatically lowers at the start of a seam and lifts again at the end. It even cuts the thread for me! So sewing these little strips was as easy as one, two, three...


All you need is two rectangular pieces of your favorite solids and batting in the same size to make the main part of the placemat. Placing the batting in between the solids, grab strips of your favorite selvedges and top-stitch them to the three layers, playing with the placement of the selvedges and exploring multiple directions. Trim and finish off with your favorite binding method in a contrasting fabric.


I hope you enjoyed this quick little tutorial on how to spruce up your placemats! I have tons of new projects coming up so check back next week to see that I have in store for you :)

Have a great summer!
Love,

Tuesday, June 11, 2013

And the winners are...

The Quilt Market giveaway has come to an end. A big thank you to all who entered! And thank you for all of your kind congratulations and comments. You sure know how to make a girl smile! So... what bag pattern did I mention in my Quilt Market recap video? The correct answer was: the Barcelona bag!

Now... the two winners are:


Congratulations to Vicki H and Janarama! They both won the Barcelona bag pattern AND the Carnaby Street fabric necessary to make the bag.

I have another giveaway coming soon! If you're signed up for my newsletter you already know all about it. You want to be in the loop? Sign up for my newsletter here. 

'Til next time... happy crafting.

Tuesday, May 21, 2013

I'm Back!

Hello everyone, I hope you're having a wonderful week. I'm finally home safe and sound from the International Quilt Market!


I need to recuperate from the excitement of winning Single Booth First Place, from meeting so many wonderful people, and from the wonderful food and sights of Portland. But I'll be back in a few days with more photos. In the meantime, you can take a peek at my Instagram!

Do something creative today!
Love, Pat

Tuesday, May 14, 2013

See you at Quilt Market!

I'll be offline a bit this week because I leaving today to Portland, OR to attend the International Quilt Market! I've worked so hard to get ready. I'm exhausted, but I know all of my hard work will pay off.

Not to worry. You can catch all of the Market action by following me on Instagram! If you're at Market please stop by and say hi! I'd love to meet you.

Until later... xoxo,
Pat

Wednesday, May 1, 2013

I'm going to Quilt Market!

Today is May 1st and the International Quilt Market, Portland 2013 is only 17 days away!


It's been very busy around here. I've been sketching out, and building, my Carnaby Street booth. My new business cards and other promo pieces are at the printer. Sewing quilts and booth decor have been taking a lot of my time. I'm so glad that I have my girls to help me! I also have the cutest Carnaby giveaway I think everyone will love.  

Although getting ready for Market is a lot of hard work, it's always worth it in the end.

Well, I have to get back to work! Be sure to check me out on Instagram for all of the behind the scenes happenings!

Enjoy the rest of your week.
Pat

Friday, April 5, 2013

And the winner is...

Thank you! Thank you! I enjoyed reading ALL 464 comments you all made about my Carnaby St. fabric line. You all warm my so much heart!

And now, for the four lucky winners of a Carnaby St. fat quarter bundle in the color of their choice.


Congratulations winners! Look for an email, for FB note, from me for you to claim your prize!

I hope everyone has a GREAT weekend :)

xoxo, Pat

Thursday, February 28, 2013

60's Hexies Love Coasters Tutorial


Hi!

Coming back to my blog after a few days of crazy work to be with you always feels so good! Today is a rainy afternoon here in Miami and I was finishing the instructions for this new tutorial with my new line Carnaby St. to cheer me up with its bright colors. For those of you having wintery and rainy days, I hope it cheers you up too... and if you are enjoying summertime on another corner of the world I guess it is always good to be making a new tutorial as well :)


MATERIALS (to make three coasters)
For this project, I used a combination of Pure Elements solids from Art Gallery Fabrics and some prints from my newest collection Carnaby Street. You will need:

FABRICS:
One (1) Fat Eighth of the following:
  • CST-3102 Psychedelia Gold
  • CST-3200 Brit Boutique Radiant
  • CST-3204 Girl About Town Rose
  • PE-405 Cherry Lipgloss
  • PE-424 Mirage Blue
½ yd of PE-408 White Linen
Three (3) 11" square sheets of non-fusible batting
Coaster Trapezoid Template

NOTIONS:
  • Ruler with 60° angle guides
  • Rotary Cutter
  • Water Soluble marker

INSTRUCTIONS (for coaster with a White Linen border)
Sew all right sides together with ¼" seam allowance. Press open.

Cut the following:
  • Cut two (2) of each of the trapezoids in the template from PE-405 and PE-424
  • Cut CST-3102, CST-3200 and CST-3204 into 1 7/8" x WOF strips
  • Cut three (3) 11" squares from PE-408
  • Cut two (2) of each of the trapezoids in the template from PE-408
  • Cut three (3) 1 3/4" x WOF strips from PE-408

Step 1. Grouping the strips
Make one group (A) that contains two CST-3102 strips and one CST-3200 strip. Make another group (B) that has one CST-3204 strip, one CST-3102 strip, and one CST-3200 strip.

Step 2. Sewing the strips together
Once you have those two groups, piece the strips in order listed above. Place the fabrics RIGHT sides facing together and sew.

Press all seams open.
 
Step 3. Cutting the strips
Once you have these long strips pieced, grad a ruler with a 60° mark and cut strips that measure 1 7/8" in width. To do this, you will cut the left corner of the fabric at a 60° angle with the slant ascending from left to right. Once that cut is done, you can proceed to use the ruler to make parallel cuts to create 1 7/8" strips.

Cut six of these strips from Group A and 3 of these strips from Group B.

Step 4. Piecing together the strips
Make three groups of the new angled strips that contain two strips from Group A and one strip from group B.

You will sew those strips together in order A-B-A, making sure the seams match. In order to do this, you will grab the first and second strip and place them RIGHT sides facing together, positioning them so that the first place that the needle in the machine hits is the exact ¼" intersection of both fabrics.
 Once done sewing, you will add the third strip, repeating the previous step.

Press seams open.

When you are done, you should have a rhombus/diamond shape like this one below...

Step 5. Attaching the borders
For the borders, I have chosen a different color for each coaster. I will show how to construct the coaster that has the White Linen borders. For the other two coasters, simply use the trapezoid templates with the Cherry Lipgloss (PE-405) and Mirage Blue (PE-424).

Grab the diamond and all of the pieces of the White Linen (PE-408) fabric that you cut with the template.

First, you will attach the smaller template pieces on opposite sides of the rhombus: the top right and the bottom left sides.

To attach these, simply align them tip to tip (RIGHT sides facing together) and sew.

Press seams open.

For the longer template pieces, you will use the same technique used to piece the angled strips. Align both pieces (RIGHT sides facing together) so that they intersect at ¼" and put your needle down exactly at this point. Sew. When you are done, you should have a piece that looks like a hexagon!

Step 6. Quilting the top
Now you're ready to quilt! Grab the 11" square of White Linen and place the 11" square sheet of batting on top. Grab your newly constructed hexagon and put it on top of the batting, making sure it is centered.

Using a water soluble pen, draw lines parallel to the edge that are 1" apart from each other. Pin the three layers in place and quilt on top of the lines.

Now draw lines perpendicular to the first lines 1" apart from each other, pin, and quilt.

When you are finished, use a rotary cutter to trim off the excess batting and backing fabric. Damp your coaster to remove the guidelines Press.

Step 6. Binding your coasters
For this step, I did a double binding to create stability. Grab 1 3/4" x WOF strip of White Linen. Fold it in half, lengthwise, and start sewing it in the middle of one of the sides of the coaster on the back, aligning the strip's raw edges with the coaster's raw edges. Leave an approximated 3" tail.

Stop stitching ¼" before the next edge of the coaster. Clip the threads. Remove the coaster from under the machine presser foot. Fold the strip in a motion of 45° and upward, pressing with your fingers.

Hold this fold with your finger, bringing the strip down in line with the next edge, making a horizontal fold that aligns with the top edge of the coaster.

Start sewing at ¼" of the border, stitching all the layers. Do the same in the six corners of each coaster.

Stop stitching before you reach the last 2 to 3 inches. Cut the threads and remove the coaster from under the machine presser foot. Lay those loose ends of the binding flat along the coaster edge, folding the ends back on themselves where they meet. Press them together to form a crease. Using this crease as the stitching line, sew the two open ends of the binding with RIGHT sides facing together (you can help yourself marking with a pencil if the crease is difficult to see).

Trim the seam to ¼" and press open.

Complete the sewing.

Turn the binding to the front of the coaster, stitching all around 1/16" from the folded edge. This stitch will secure the binding and it will create a decorative top-stitch.

When you get to each corner, cross-fold the fabric, stop right at the intersection, pivot, and continue sewing.

I hope you enjoyed the tutorial :) You can make a few to renew your outdoor patio decoration this coming spring, or to give them as gifts to your friends for their own decoration...

I had so much fun... now is your turn!

Much love, Pat
Enhanced by Zemanta
10