Showing posts with label sewing. Show all posts

Thursday, January 28, 2016

FREE Project: On a Cloud of Fabric

Happy TBT!

I hope you all are having a wonderful and creative week. Coming back to my blog after few days of crazy work is like a breath of fresh air. Blogging and sharing my projects with all of you is one of my many favorite parts of the week. For the longest, I wanted to share with you my Pillow Bed tutorial which features Naturella and Nature Elements Collections, indeed a TBT! These are so much fun to make, and I completely forgot about them, I cannot believe it. But, thanks to a productive week I found the files on my computer, oh joy! Please lovelies enjoy making this fabulous Pillow Bed project as much as I did!

To download the step by step instruction click here.


Isn't this perfect for an afternoon picnic? 


What You'll Need:
  • 1 yd of Fabric A
  • 1 yd of Fabric B
  • 1 yd of Fabric C
  • 1 yd of Fabric D
  • 1 yd of Fabric E
  • 1 yd of Fabric F
  • 1 yd of Fabric G
  • 1 yd of Fabric H
  • 1 yd of Fabric I
  • 18 pillow forms (14")

Happy sewing my lovelies!

Love,

Pat


Tuesday, December 30, 2014

ETNO Flying Geese Table Runner

Hi! How was your Christmas Holiday super looong weekend? I hope you have had lots of happy family gatherings with your loved ones. Christmas is always so full of a magical spirit, don't you think? Our celebration was so good! We were 6 at the table and my mother was the queen! My husband, son, my sister and me felt this holiday very special for having her, at her 87 years of age, strong and so happy! 


I was working lots these days spent at home... I didn't go to work last Friday, so this holiday felt almost as a vacation! Since I had more time to sew, my priority was to finish the runner made with the new flying geese method I shared with you on a previous post here

My new ETNO collection ships to stores late January and I think this table runner can be the first sample for you to see my fabrics in action!

I had the top ready sewn days ago, so the only thing was to decide how to quilt it. The order of the day at my sewing room was to relax and have fun with straight line quilting! 
etnofabrics quilt quilting patbravo ethnicfabric

First I thought about straight vertical quilting, but looking at the triangles I had the impulse to do straight lines in angle that will replicate the geese. I love how it came out! Working with my Bernina walking foot and the marking it has, I went for 1/2" seams.


There was a moment that I was so excited to see how it was looking that I did a small section in the center of the runner reducing the spacing to 1/4" apart that I'm showing on the pic below. 


Oh... the magic of quilting... These are the moments that I enjoy the most!!


Because I'm only working with strike offs (the first sample the mill sends me to correct the final production) I'm using all the scraps left from the top cutting; so I decided to put them to good use on the back, combining them with stripes of the AGF "Square Elements" in Lemon and my beloved "Wanderlust" in Luna from the INDIE collection I've designed some time ago. Scrappy scrappy!


On the binding, I've combined a creamy grey with small sections of teal from the AGF "Pure Elements" line of solids. I love the pop and modern effect of these kind of combinations!


Hope you liked it! I'm crazy in love with this runner, and can't wait until my new ETNO line gets shipped to stores late January so you can put your hands on it! What's going to be the order of the day at your sewing room?

Thanks for stopping by today! Xo, Pat

Thursday, December 26, 2013

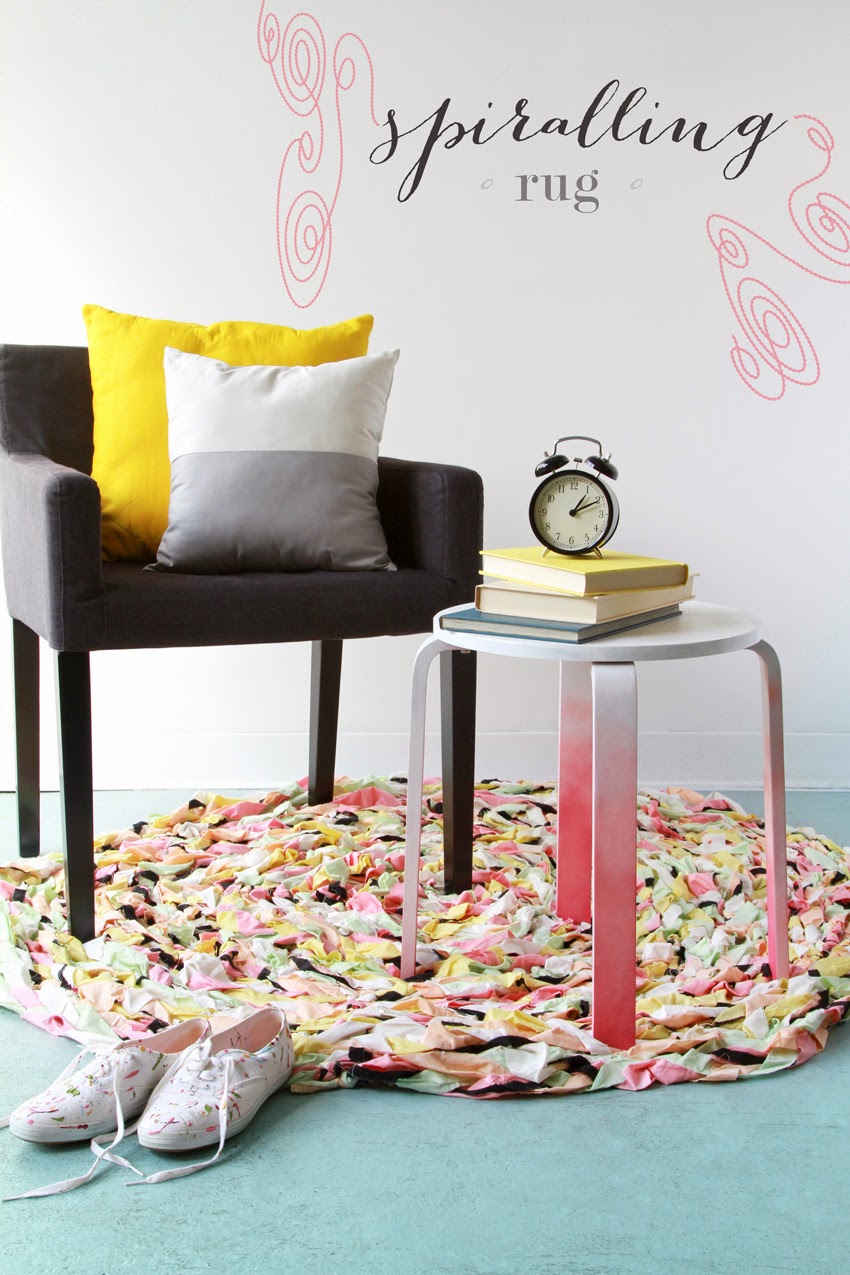
Spiralling Rug Tutorial


Hello lovelies!

I hope everyone is having a great Holiday Season. During the Houston Quilt Market I received so many compliments on the rug that I had in my booth. Many asked me to make a tutorial, so I am finally posting it.

It is a simple process that brings beautiful results. Today I am focusing more on the technique and from there you can apply it to your own projects.

For my rug I used 1" x WOF ripped strips from Pure Elements' Banana Cream (PE-435), White Linen (PE-408), Peach Sherbet (PE-444), Quartz Pink (PE-411), and Sweet Mint (PE-443). I also used 1/2" x WOF ripped strips of Caviar (PE-413) from Pure Elements as well.


The rug consists of fabric braids. Each braid is made with three 1" strips (choose colors randomly), and one strip of Caviar which you will keep together with which-ever one of the colors throughout the entire braid.

The first step is to make an over-hand knot with all of the strips at once. Make it as close to the edge as possible.

Hold the knot between your knees to create stability. Start making a three-strand loose braid. You can also clasp it to something like a table where you can pull gently without the braid coming apart. Make another over-hand knot at the end of the braid.

Create a spiral with the braid.


Continue making braids until you reach your desired diameter. Mine was 60".


Once you have the size that you want, pass thread from one side to the other making sure you go through the center of your rug each time. Repeat in various directions making sure you create knots at both ends to hold the rug together. This is a very delicate rug. The more you hold it with thread, the stronger it will be.


Happy sewing! xoxo,

Thursday, October 17, 2013

FREE PROJECT : The Saddle Bag

Hey everyone!

How's the fall season treating you? I know I can't really complain, being in Florida and all. But some days it's rainy and gray for days, truly the perfect to get cozy with a favorite quilt and a nice movie.

So, if you are experiencing some blah weather, let me brighten up your day with a brand new FREE PROJECT!

You know when you have to go do some errands around town and need to carry the basics (say, keys, cash, cellphone, etc.) but at the same time you want to travel light? Well I got the perfect project for you! Introducing: The Saddle Bag.

SaddleBag2

This cute little bag can fit the basic items you just can't leave the house without; and it is soooo easy to make!

Saddlebag3

This one is made with the AGF Oval Elements line for the body of the bag and Dreaming in French for the strap and lining. I put a little tassel to give it kind of a bohemian feel, but you can go for a different look and add a little brooch, button, or whatever you can think of!

SaddleBag

Cute, huh? The best part is that it is absolutely free to download here, so what are you waiting for?

Click here to download the project. Visit patbravo.com to see more sewing and quilting free projects.

Happy sewing!

Tuesday, October 15, 2013

I'm going to Quilt Market!

Fall International Quilt Market in Houston, is only 12 days away!

I'll be debuting my new collection, Rapture, due out this November. I've been sewing lots of projects for my booth. If you missed me on Facebook and Instagram, here are some sneak peeks of what I've been working on.


The fabrics are inspired by the designer KENZO and the watercolor style that has currently become the latest trend, so I'm doing lots and lots of prop painting as well. I'm so glad that I have my girls to help me!

Although getting ready for Market is a lot of hard work, it's always worth it in the end.

Well, I have to get back to work! Be sure to check me out on Instagram for all of the behind the scenes happenings!

Enjoy the rest of your week!

Tuesday, September 24, 2013

the BERNINA Creative Consultant

On the blog today I'd like to share with you my Tuesday BERNINA tips that I regularly post on my Instagram. Every week I give sewing tips with the amazing BERNINA 780, so be sure to check them out if you haven't already! You can catch up with my BERNINA tips on my Pinterest Sewing & Quilting Basics board.

So, I'd like to talk about the BERNINA Creative Consultant. This feature is truly amazing! It is so amazing, that I actually decided to make it into a blog post, instead of my usual Instagram tip. Let's take a look at how great this feature is!

The BERNINA 780 Creative Consultant

Have you ever started to work with a new kind of fabric and you had to go through the daunting task of testing your needles and tension just to get the desired stitch? What a time waster!

The BERNINA 780 Creative Consultant

The Creative Consultant gives you all of the information you need when working with specific materials!

The BERNINA 780 Creative Consultant

All you have to do is click on the super cute mannequin icon to reach the Creative Consultant menu.

The BERNINA 780 Creative Consultant

You'll see a variety of fabric options at your fingertips. Everything from different weights of woven and knits to jeans and fur. Even leather and lace!

The BERNINA 780 Creative Consultant

All you have to do is select the fabric you are working with. Let's say we're working on a pair of denim jeans. So you would click the jean pocket icon.

The BERNINA 780 Creative Consultant

The next screen shows you different sewing selections. You can pick seams, buttonholes, decorative stitching and more! When you make your selection the needle, presser foot and thread tension that is needed is displayed. Click the green check mark and the BERNINA is ready to sew!

The BERNINA 780 Creative Consultant

It's as simple as that. This is truly why I love this machine! It is so capable of handling any task, that you simply fall in love with it.

Be sure to check your Instagram feed for some more BERNINA tips from me on Tuesday!

XO,

Monday, September 23, 2013

Sewing Summit Recap

Hello lovelies!

I'm back from Sewing Summit and all I can say is that I miss it already! It was truly one of the most memorable experiences I have ever had, having taken part in this wonderful gathering of sewers and quilters alike. I had the pleasure of meeting some wonderful people and getting to know them was definitely the highlight of this event!

Here's a little recap of all the special moments I shared.

I was so honored to teach my class on fabric design named "Designing Fabrics from the Heart." I had 80 students attend! Can you believe it? I was so thrilled that they all came to see me, I could not hold back how happy I was.

Sewing Summit 2013, classes

I was beyond ecstatic to find out that many of my students were inspired and enjoyed at all the information I had to give, that they even shared their moments in my class with the rest of the world! Many people took away my quote, "To be creative is to let little pieces of your heart go and place them into each project you make."

Designing Fabrics from the Heart

I was also happy to see that everyone enjoyed their handouts and fabric samples. Great pics everyone! Can't wait to see what you all do with those goodies.

Sewing Summit 2013, friends

It was also great to see old faces and finally meet online friends in person! It's events like these that truly let you connect with all the great friends you have around the world!

Sewing Summit 2013, sewing

And finally, the BERNINA sewing room was AMAZING! It was open until 1 a.m. every night with two rooms that had the 780s (the same baby I have at home) and the 350s! Sewing at night with such wonderful and creative people was a great experience, one that I will truly treasure.

And not only did I teach a class, but I was able to take some as well. English Paper Piecing taught by Kaye Prince (Miss Print) was a fun and easy class that taught you the basics on how to get started. I learned a lot of interesting things with Ellen March's (Sew It All TV) Getting Published in a Magazine. And Jeni Baker's (In Color Order) HTML Basics for Bloggers was definitely chockfull of information on how to code and design your heart away on your very own blog.

Now, for a little tidbit of what I taught, I'll leave you with a few rules that I feel are important when it comes to fabric design!
  1. You have to design following your heart!
  2. You have to love the colors you work with!
  3. You have to deliver each & every time!
  4. It takes time, so be patient!
  5. Always know the audience you are designing for!
I hope you all enjoyed my Sewing Summit recap and that you all had a great weekend! Tomorrow I'll have a special BERNINA sewing machine tip. And on Thursday, I will be sharing some more What I'm Loving Right Now, so stay tuned for that. :)

XO,

Tuesday, September 17, 2013

I'm Speaking at Sewing Summit 2013

Tomorrow I'm heading to Salt Lake City for a modern blogging and sewing conference called Sewing Summit! It's a cross between a traditional sewing retreat and a social media or blogging conference and it's been sold out for weeks! This will be my very first time attending and speaking! I'm so excited!

Sewing Summit 2013

My class will be a fabric design class called "Designing Fabrics From the Heart." I've put a lot of my heart and soul into this class! I want the Sewing Summit audience to learn the basics on how to get started designing a fabric collection. I know how hard it is to be a textile designer. In the beginning no one wanted to give me a chance. I'm grateful to be where I am today and I want to be able to share and give back.

Designing Fabrics from the Heart

I want everyone to discover the designer within them by learning how to gather inspiration from the world around them, and learn how to put together the things they love to create a story board for a fabric collection.

I love color! So I'll be teaching how to cultivate color stories and how to relate them to a concept for a fabric collection. I'll also be teaching how to analyze designs to make a balanced fabric collection. Furthermore, I'll be sharing all the software necessary to make stunning designs and the  basics of different pattern repeat modes as well as recoloring methods!

Here is a sneak peak of my presentation! The audience's mind is going to be blown away with all of the images and information that I have to share!

WOW, that's not even the whole presentation! I really hope that I can fit everything into my 75 minute class. My message to every aspiring designer is:

"To be creative is to let little pieces of your heart go & place them into each project you make." - Pat Bravo

I'll be away from the blog for the rest of the week. So be sure that you follow me on my Instagram for all of the Sewing Summit action. I'll be back later next week with a recap!

Are you a blogger attending Sewing Summit this weekend? If so, give me a shout. I’d love to meet you!

Later Loves, xoxo,

Monday, September 16, 2013

And the winners are...

Hello there! I hope you all had a wonderful and relaxing weekend! I enjoyed reading all of your entries on my blog and Facebook page of what you would make with the 'bundle of joy.' There were so many unique and thoughtful gift giving ideas!

Now I have for you the TWO winners of the giveaway!


Congratulations Phyllis and Meg! They will each receive the fat quarter bundle of joy of 11 prints. I can't wait to see Phyllis' patchwork pillow and Meg's beach blanket!

Happy sewing!

Thursday, August 29, 2013

FREE PROJECT : Fabric Bin

Hello lovelies!

Today I have a special treat for all of you! I'm sharing with you a stylish way to organize your sewing studio. They're called Stash Away Fabric Bins, and they are the perfect solution for de-cluttering all that mess that has been accumulating in your studio!


Use them to organize your fabric scraps, misplaced threads, or even use them as your current project bag, where you have all your necessities for your current project in one place.

Here is what you need to make the Stash Away Fabric Bins.

The approx. finished size of each bin are as follows: Small bin: 12 ½" x 5", Medium bin: 14" x 6" & Large bin: 16 ½" x 8".

MATERIALS:
The medium size bin:
1. (1) 16” x 20” rectangle of Go-Go London Lustrous (Carnaby St. collection)
2. (1) 16” x 20” rectangle of Raspberry Rose (Pure Elements collection)
3. (1) 16” x 3” rectangle of Raspberry Rose (Pure Elements collection)
4. (1) 16” x 20” rectangle of Hard Interfacing

The small size bin:
1. (1) 14” x 17” rectangle of Ladylike Green tea (Carnaby St. collection)
2. (1) 14” x 17” rectangle of Fresh Water (Pure Elements collection)
3. (1) 14” x 17” rectangle of Hard Interfacing

CUTTING INSTRUCTIONS:
1. Cut (6) 3½” x 23 strips of Nocturnal (Pure Elements collection)
2. Cut (6) 3½” x 23 strips of Empire yellow (Pure Elements collection)
3. 1/4 yard of Girl about Town lime (Carnaby St collection)
4. 1/4 yard of Girl about Town Rose (Carnaby St collection)
5. 1/4 yard of Psychedelia Gold (Carnaby St collection)
6. 1/4 yard of Psychedelia Peridot (Carnaby St collection)
7. 1/2 yard of double stick fusible.

Here are the instructions for this medium sized Stash Away Fabric Bin with flower applique.


Make two rectangles of 6 strips each (3 strips of Nocturnal, and 3 strips of Empire Yellow).


Sew lengthwise with a 1/4" seam allowance alternating colors. You now have 2 rectangles each measuring 18" x 23". One is your lining and the other one is the frontal piece of the bin.


Grab the pieces of Girl About Town Lime, Girl About Town Rose, Psychedelia Gold, Psychedelia Peridot (from my Carnaby St. Collection), and the double stick fusible. Place the fabric on one of the sides of the fusible and iron it at a low temperature. This will stabilize the fabric so that you can cut each flower carefully. Cut through both; fabric and fusible.


Layer the lining and the frontal piece of the box face-to-face and pin them on top of the interfacing (the lining should be on top of the interfacing). Pin the layers together and sew along the edges with a ¼” seam allowance.


It is very important that you leave an opening of about 4" at the bottom, or enough space to turn the piece inside out.


Trim the excess material and turn it inside out. Shape the corners with a small pointed tool.


Press heavily, remember to close the opening that you left by hand-sewing it with an invisible stitch.


Now it's time to close our box. Fold the rectangle in half by matching each corner (the front of the box should be facing itself). Stitch along each side with a ½” seam allowance and then mark the bottom fold with a pin (this is the base of the bin).


Fold the base and align the side seam with the pin to form a triangle. Stitch across 3” in from the tip and repeat the same step in the other side.


The last step is to turn the piece right side out and fold the top edge over.

And that's it! See how simple it is! You can make sets of these to give to your friends or various sets of your own and place them in any room that just needs a little touch of style to organization.

Have a great Labor Day weekend!

10